Home Blog Page 9

13 Step by Step Transparent Clothes Effect Tutorial in Photoshop

13 Step by Step Transparent Clothes Effect Tutorial in Photoshop13 Step by Step Transparent Clothes Effect Tutorial in Photoshop

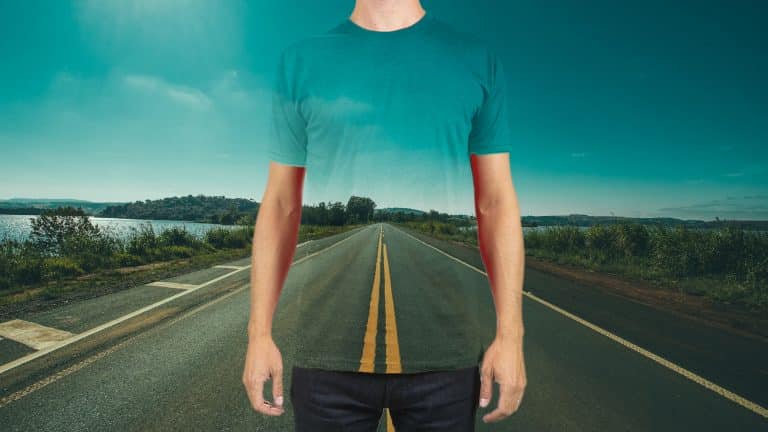
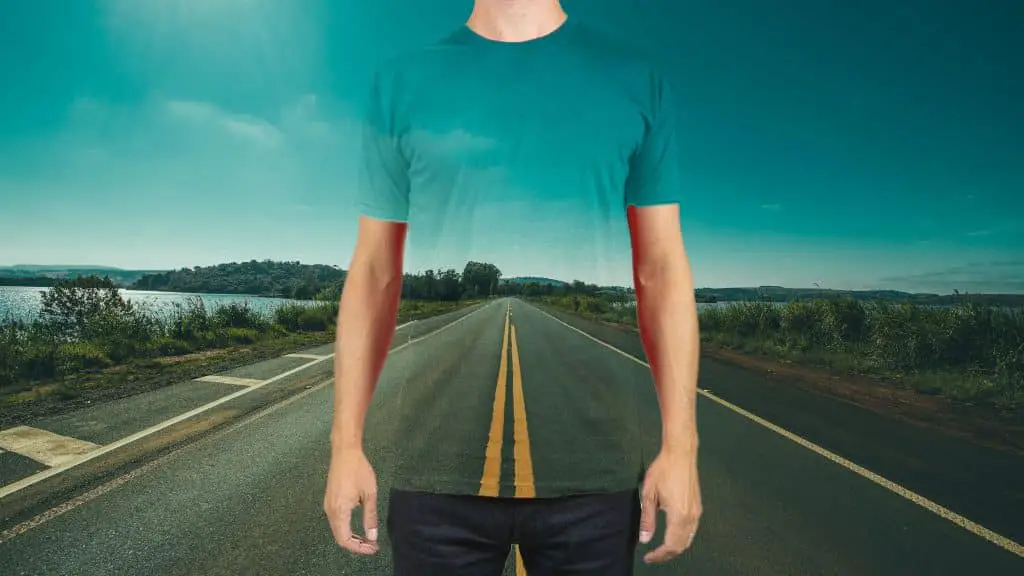
Ever wondered how to make your t-shirt transparent that it looks like your wearing a scenery? In this article, I’m gonna show you very easy 13 Step by Step Transparent Clothes Effect Tutorial in Photoshop. So let’s get started.

If you want to use the images that I’m using, feel free to download it below.

Model: https://drive.google.com/file/d/1PfmRgqBOg_T8Ck7EIXywr4RRup_0nO5_/view?usp=sharing

Background Image: https://drive.google.com/file/d/1TbljQw_7wOLlg3zY1J7lpxdIJ3xF1pSL/view?usp=sharing

1. Resize the Background Image
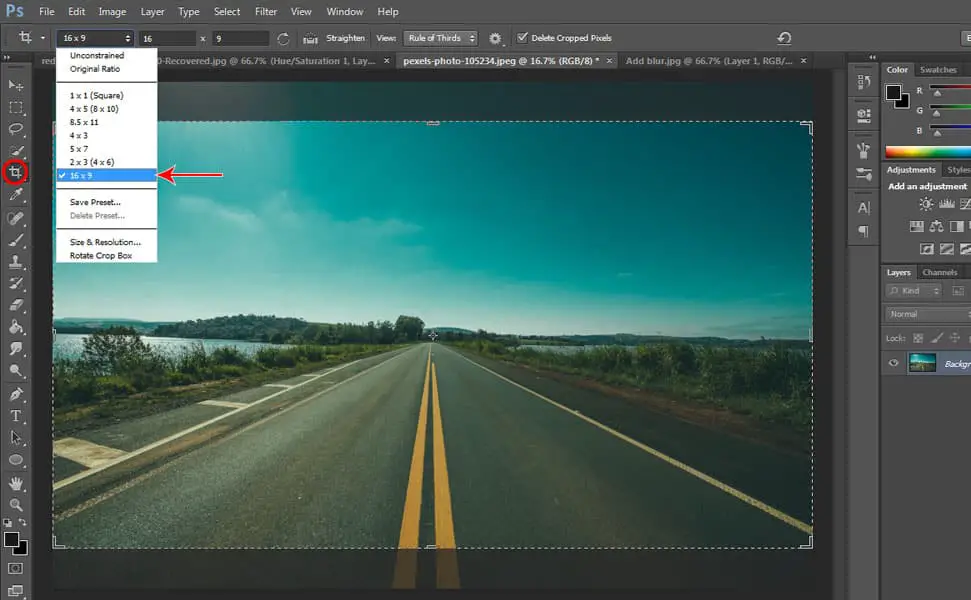
13 Step by Step Transparent Clothes Effect Tutorial in PhotoshopOpen the ‘Background Image’ that you’re going to use and select the ‘Crop Tool’ then turn it to
16×9 cinematic ratio as shown in the picture.

2. Place the Model in the Background
13 Step by Step Transparent Clothes Effect Tutorial in Photoshop
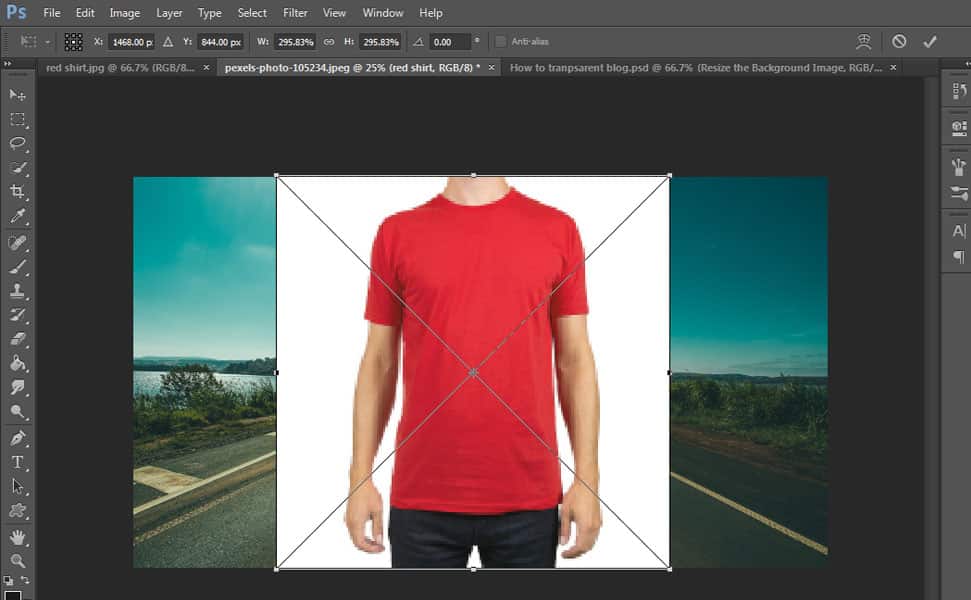
Drag the model image to the background file and resize it by pressing CTRL + T and fit it in the
background.

3. Remove the White Background of the Shirt
13 Step by Step Transparent Clothes Effect Tutorial in Photoshop
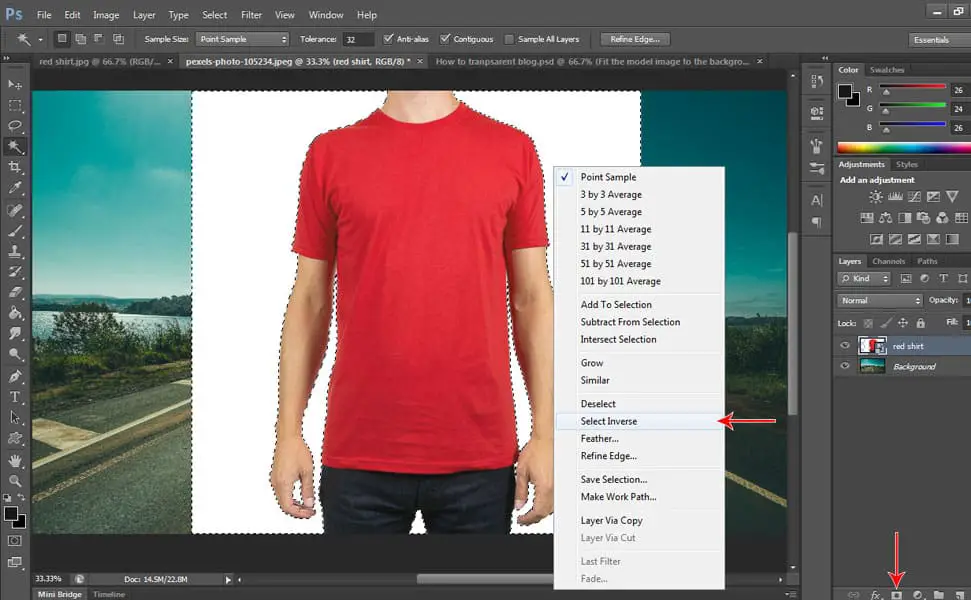
Select ‘Magic Wand’ then select all the whites in the background, make sure you selected all the whites by pressing ‘SHIFT’ while you click on the whites. After selecting all the whites, right click and choose ‘Select Inverse’. Then click the ‘Add Layer Mask’ icon located below the layer tab.

See related article: 16 Step by Step Smoke Effect Tutorial in Photoshop

4. Trace the Shirt
13 Step by Step Transparent Clothes Effect Tutorial in Photoshop
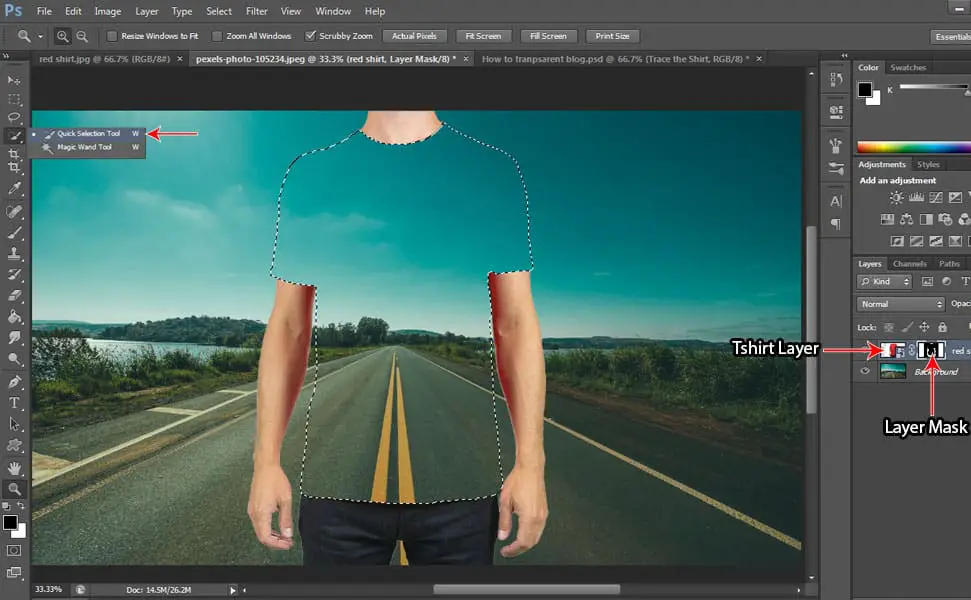
Select the ‘Quick Selection Tool’and select the shirt only. After selecting the shirt, make sure your foreground color is black then click the ‘Add Layer Mask’ icon then press ‘ALT + Backspace’ to delete the shirt. Then select the model layer and press CTRL + J to duplicate the layer.

5. Erase the lines of the Shirt’s Edges
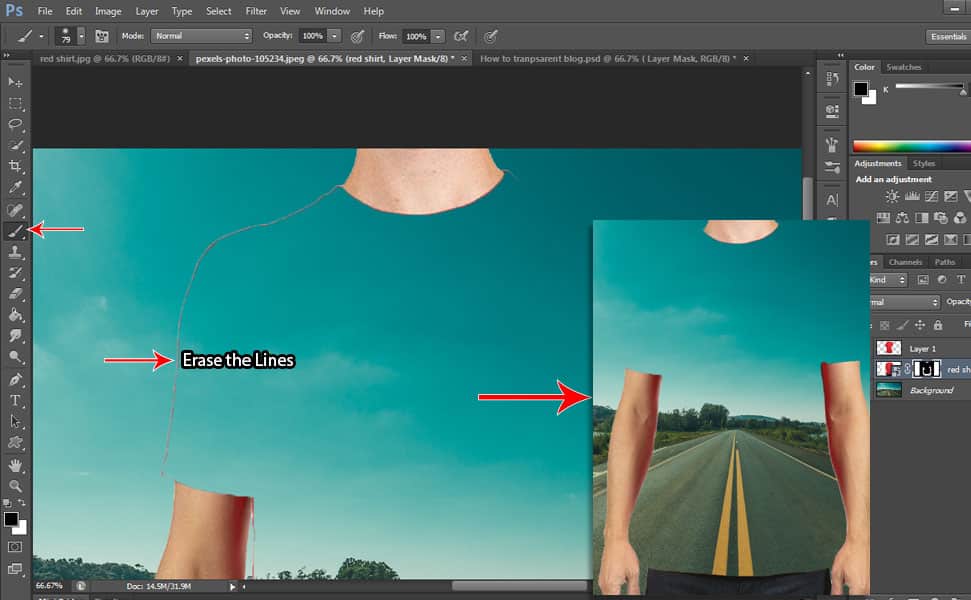
13 Step by Step Transparent Clothes Effect Tutorial in PhotoshopThe first thing to do is turn off the visibility of the duplicate layer cuz we don’t want anything to do with it for now, so by clicking the eye in the box located beside the duplicate layer, you hide its visibility. Then select the ‘Layer Mask’ of the model layer then select ‘Brush Tool’ and make sure your foreground color is Black then erase the lines of the shirt’s edges by using your brush tool.

6. Turn the Duplicate Layer to Black and White
13 Step by Step Transparent Clothes Effect Tutorial in Photoshop
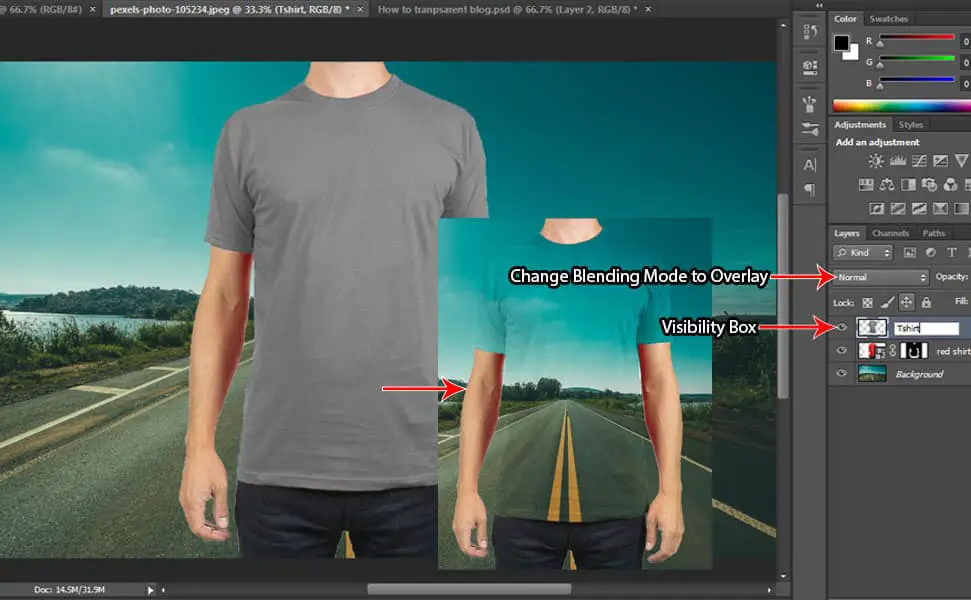
Select the duplicate layer and turn on the visibility of the duplicate layer by clicking the box located at the left side of the duplicate layer then press CTRL + SHIFT + U to desaturate or to make it black and white. Then rename the duplicate layer to ‘tshirt’ so it won’t get confusing later. Then click the ‘Blending Mode’ option located at the upper left of the layer tab and change it from ‘Normal’ to ‘Overlay’.

7. Apply an Adjustment Layer
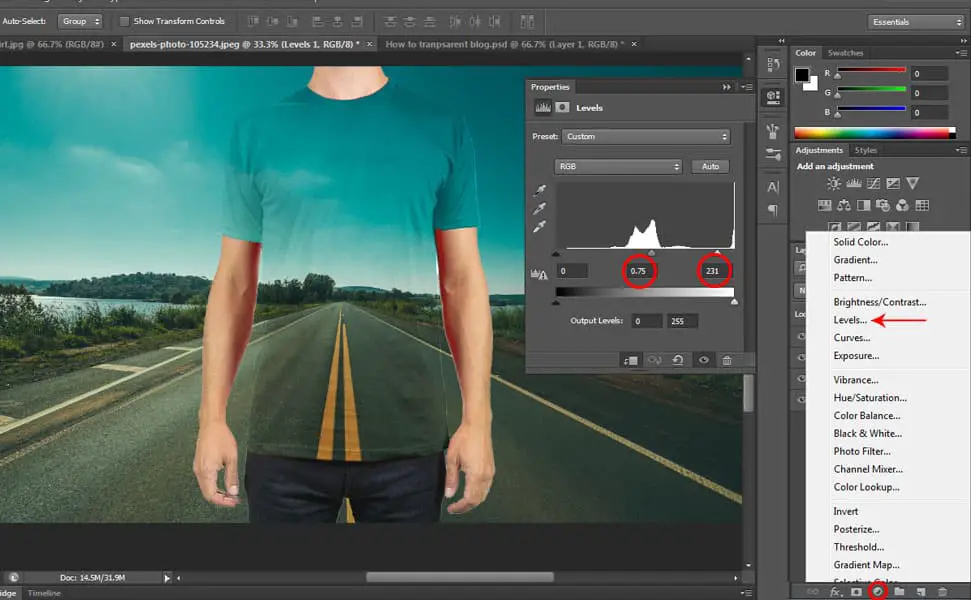
13 Step by Step Transparent Clothes Effect Tutorial in Photoshop
Click the ‘Add Adjustment Layer’ icon located below the layer tab and select ‘Levels’ then on the ‘Levels’ box, type in the mid ‘0.75’ and on the right side type in 231, to add more contrast for the ‘tshirt’ layer. After that, right click on the ‘Levels’ layer then select ‘Create Clipping Mask’.

8. Clean the Edges of the Shirt
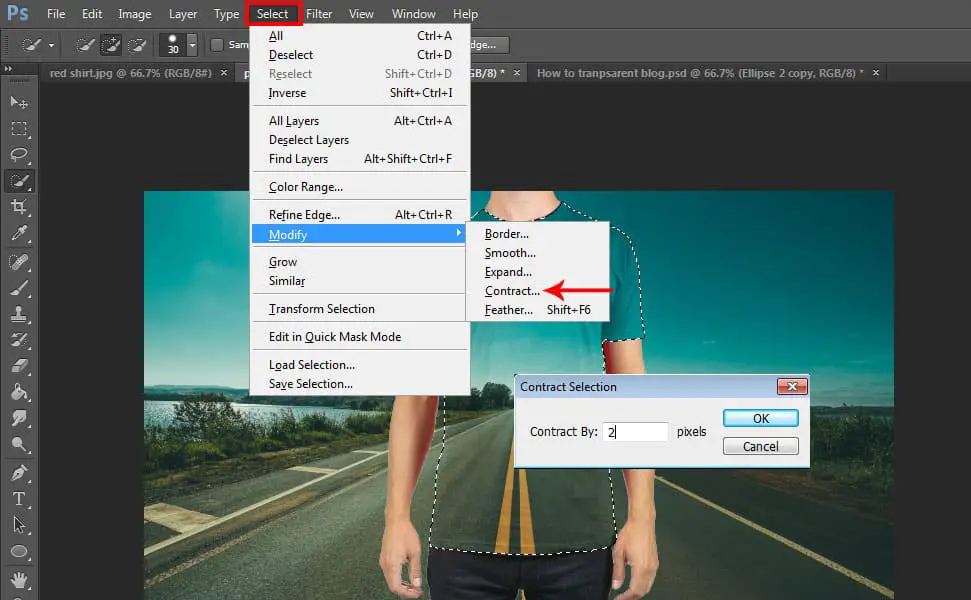
13 Step by Step Transparent Clothes Effect Tutorial in PhotoshopYou notice the white edges of the shirt? To remove it, simply select the ‘tshirt’ layer by pressing CTRL + click on the thumbnail of the ‘tshirt’ layer then click ‘Select’ located at the top bar then select ‘Modify’ then ‘Contract’ and set it to 2 pixels then press ok. Then press SHIFT + CTRL + I to inverse the selection then simply press ‘Delete’ key then deselect the selection by pressing CTRL + D. After that,
you can see that you don’t have that white edges anymore.

9. Save a New Tshirt File for Displacement Map
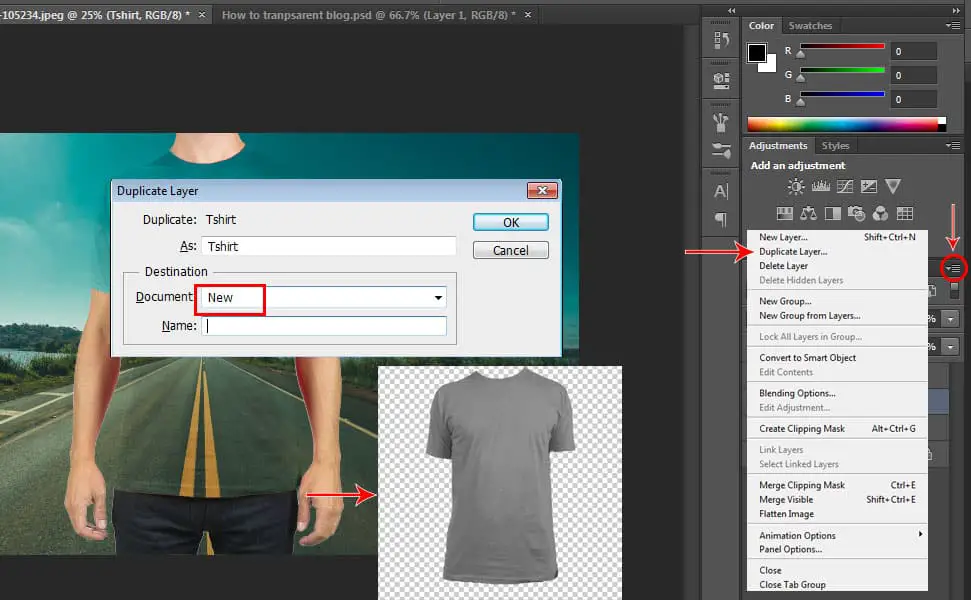
13 Step by Step Transparent Clothes Effect Tutorial in Photoshop
Click the ‘Square’ icon located at the top right of the layer tab as shown in the picture then select ‘Duplicate Layer’ and you will see a pop-up box where you have to change the Destination option of ‘Document’ to ‘New’ then press ok and you will be redirected to a new ‘tshirt’ document.

10. Blur the New Tshirt
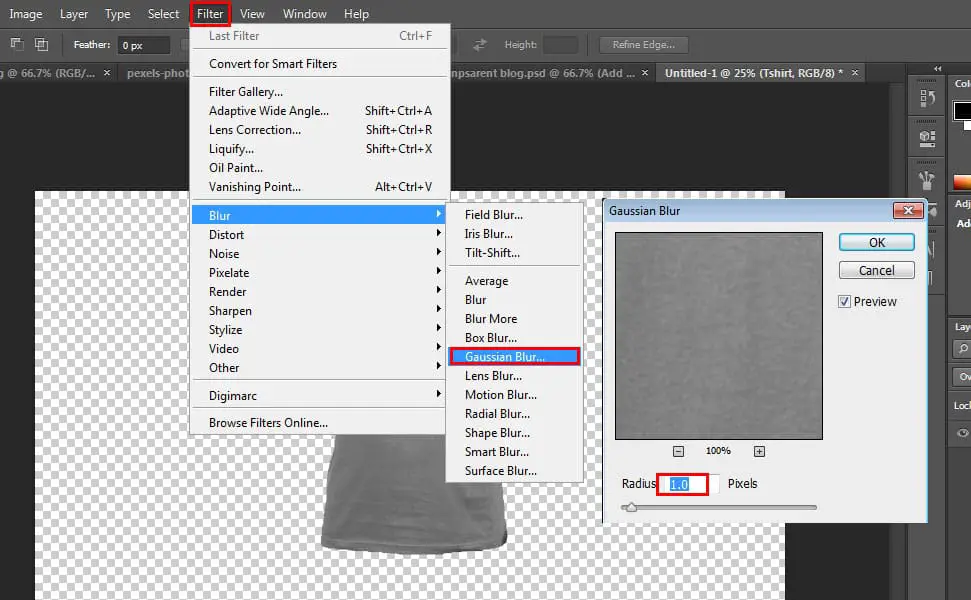
13 Step by Step Transparent Clothes Effect Tutorial in Photoshop
Go to Filter then select ‘Blur’ then ‘Gaussian Blur’ and set the Radius to 1.0 pixels and that should
be enough. Then save it and name it Displacement Map.

See related article: 14 Step by Step Comic Style Cartoon Effects Tutorial in Photoshop

11. Add A Displacement Map Filter
13 Step by Step Transparent Clothes Effect Tutorial in Photoshop
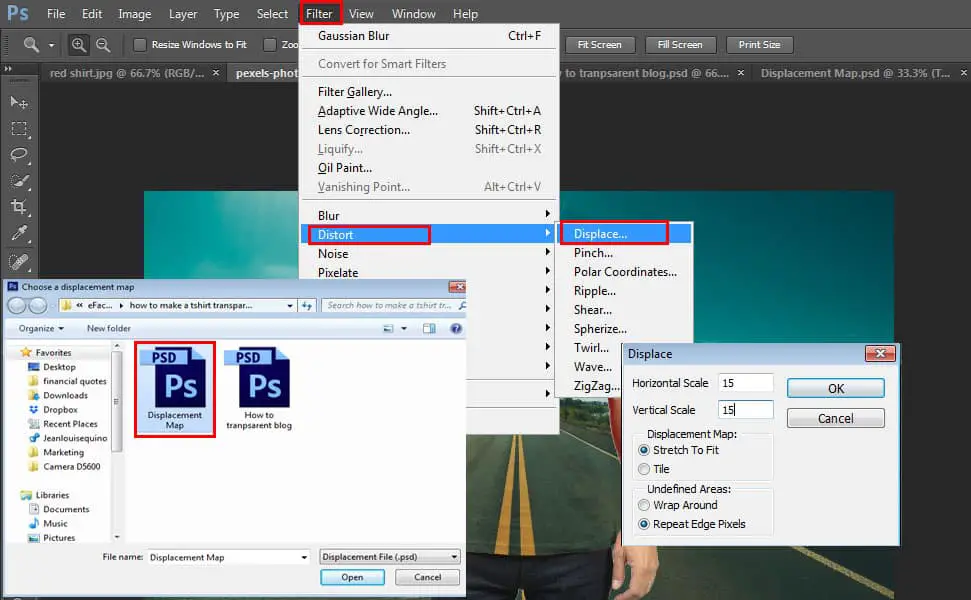
The first thing to do is double-click on the background layer then press ok to unlock it, now it’s renamed to ‘layer 0’ then right click on it and select ‘Convert to Smart Object’. Then go to ‘Filter’ tab then Select ‘Distort’ then choose ‘Displace’ and then you can see a pop-up box so make sure the Horizontal and Vertical Scale is set to 15, and choose ‘Stretch To Fit’ and ‘Repeat Edge Pixels’ then press ok then select the Displacement Map file you saved earlier.

12. Apply the Displacement Map Filter on the Tshirt
13 Step by Step Transparent Clothes Effect Tutorial in Photoshop
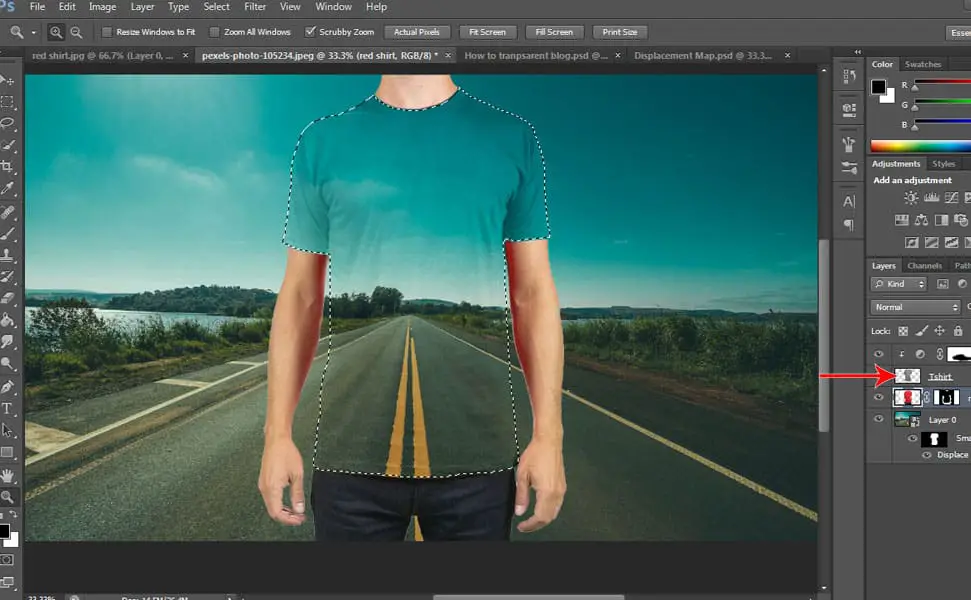
You can see that we applied the displacement filter on the whole image but we only want it for the t-shirt, so to make the effects visible for the t-shirt only, select the ‘Smart Filters’ layer (layer 0) then press CTRL + I to inverse it. Then hold CTRL then click the thumbnail of the ‘tshirt’ layer to make a selection of the shirt then select the ‘Background’ layer (layer 0) then make sure your foreground color is set to ‘White’ then simply press ALT + Backspace then deselect by pressing CTRL + D. Now, you can see the effects applied to the t-shirt only. You can see the difference by turning the visibility on and off by clicking on the box beside the Smart Filter located under the Layer 0.

So that’s it! Hopefully, you followed the instructions correctly and got the awesome result on your end. And if you have any questions, feel free to comment below.
9 Hilarious Donkey Pictures, You’re Bound To Love

Believe it or not, some of the funniest pictures that you’ll ever see online, are of donkeys. Why these animals are so funny, we really don’t know. But the faces they make, and the quotes that go along with them are certainly enough to make you chuckle.

So, whether you’re wanting to laugh, or you’re just a fan of donkeys, be sure to check out the list below!

1. A Very Well Timed Photo Indeed…

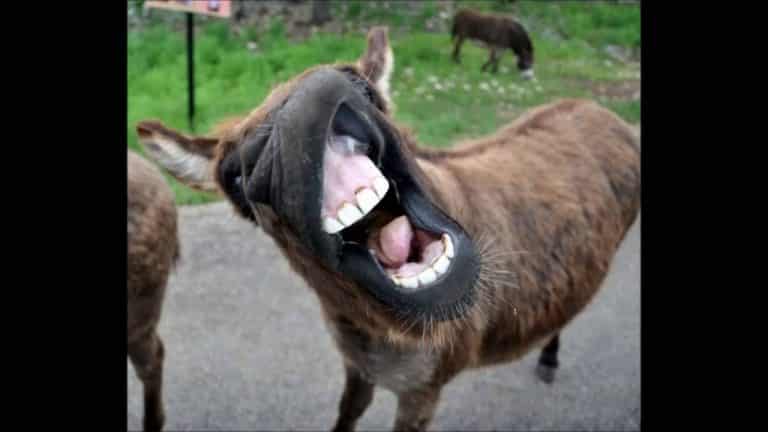
Not only is this photo perfectly timed, but it is completely unedited too. Meaning that this is the actual face the donkey had at that exact moment in time…

A Very Well Timed Photo Indeed…

2. A Very Cool, Sunglasses Wearing Donkey, With A Really Neat Hat

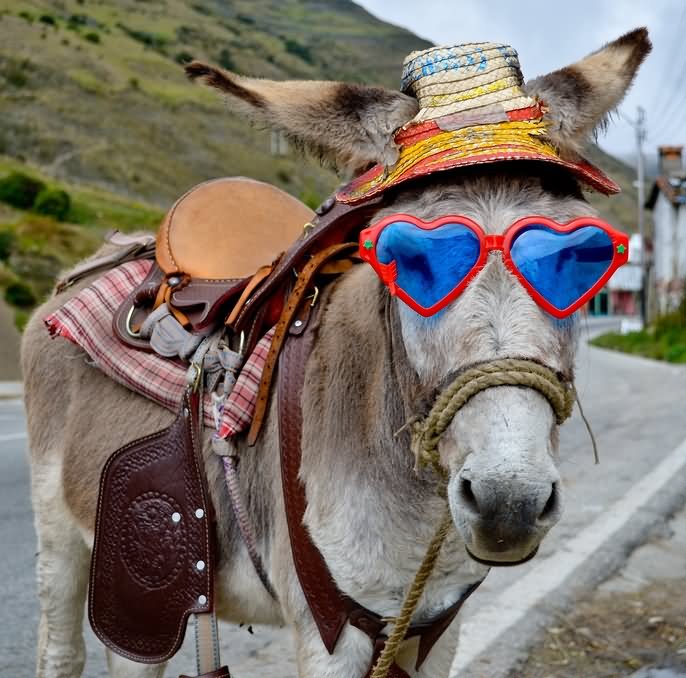
In addition to being really cool, this donkey also looks like a great animal to ride on. He’s got a saddle and everything!

A Very Cool, Sunglasses Wearing Donkey, With A Really Neat Hat

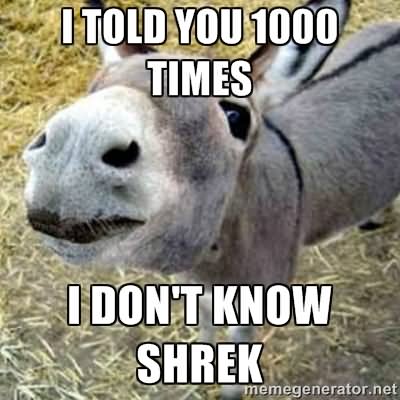
3. “I Told You 1,000 Times, I Don’t Know Shrek”

Perhaps the most commonly asked question towards donkey’s…

“I Told You 1,000 Times, I Don’t Know Shrek”

4. A Very Funny, Pants Wearing Donkey

This poor donkey has a pear of blue jeans on. No wonder he looks so sad!

A Very Funny, Pants Wearing Donkey

5. A Hilarious Pose, From A Donkey Begging For Food

Believe it or not, this is actually what most donkeys look like when begging for food. How funny!

A Hilarious Pose, From A Donkey Begging For Food

6. “We All Have That One Friend”

Well, to be honest, I can’t tell if this one is more funny or sad…

“We All Have That One Friend”

7. A Donkey Who Appears To Be Asleep, But Actually Isn’t

If you really look closely, you can see him peeking through his eyes with a little smirk on his face…

A Donkey Who Appears To Be Asleep, But Actually Isn’t

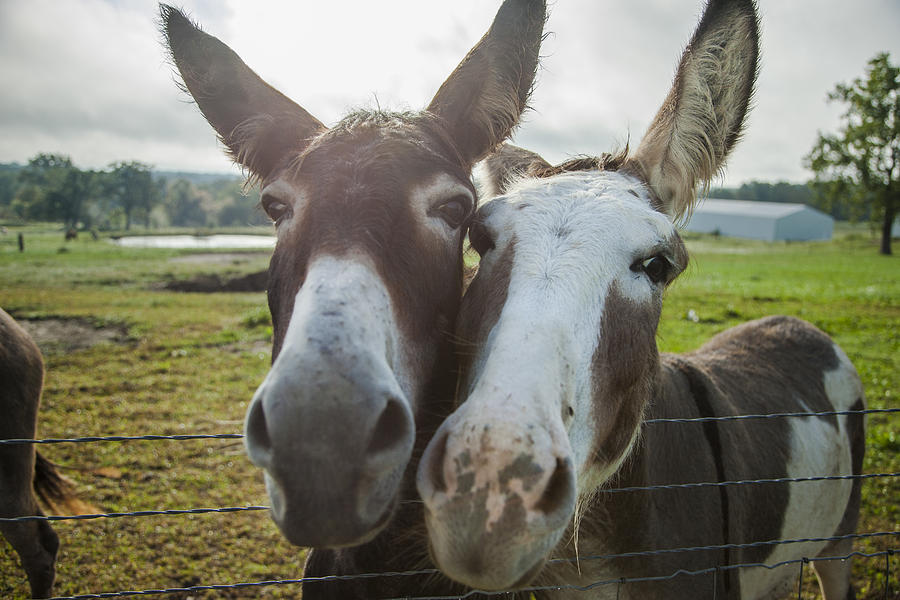
8. Two Adorable, Yet Funny Looking Donkeys, Just Hanging Out With Each Other

As you can see, donkeys are even funny when they’re hanging around doing nothing…

Two Adorable, Yet Funny Looking Donkeys, Just Hanging Out With Each Other

9. An Insect With A Donkey’s Face Added On

Proven by the picture below, any picture can instantly become funny with a donkey’s face added into the mix…

An Insect With A Donkey’s Face Added On

16 Step by Step Smoke Effect Tutorial in Photoshop

16 Step by Step Smoke Effect Tutorial in Photoshop

16 Step by Step Smoke Effect Tutorial in Photoshop

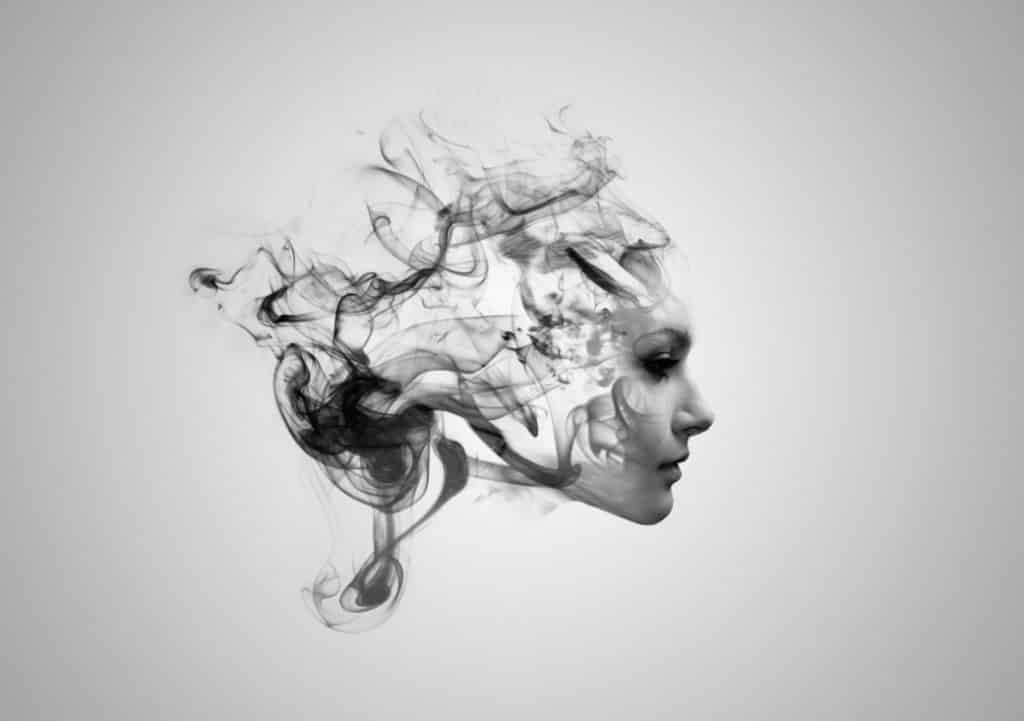
In this tutorial, you’ll learn how to transform an image into a Smoke Photo Effect by following these 16 Step by Step Smoke Effect Tutorial in Photoshop. It’s very easy to learn and you will be satisfied with the awesome results and you can even experiment how you’d want to combine the smoke brushes and the image you’ll be using.

If you want to use the image and the smoke brush that I’m using you can download it from here:

Model: https://reine-haru.deviantart.com/art/Rowena-Braids-Stock-268905936

Smoke Brushes: 

https://www.brusheezy.com/brushes/48403-25-hi-res-smoke-brushes

https://xresch.deviantart.com/art/22-Normal-Smoke-Brushes-197982419

So let’s get started.

1.Quick Selection

16 Step by Step Smoke Effect Tutorial in Photoshop
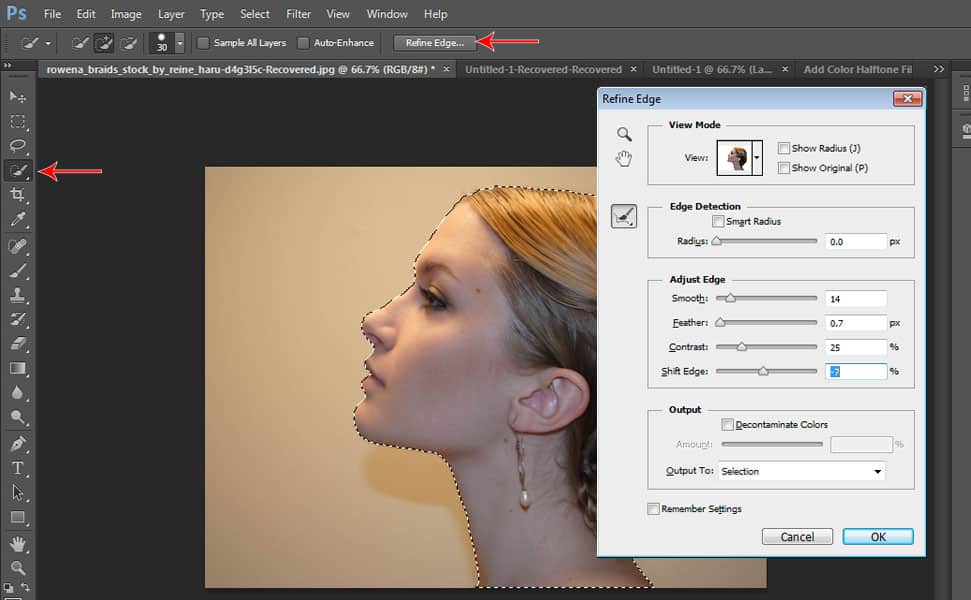
Open the image that you want to use then trace the model using the ‘Quick Selection Tool’. Make sure you properly trace it. Then click ‘Refine Edge’ then set the ‘Smooth’ by typing 14, then the ‘Feather’ 0.7, then Contrast 25, shift edge -7.

2. Add a Layer Mask

16 Step by Step Smoke Effect Tutorial in Photoshop
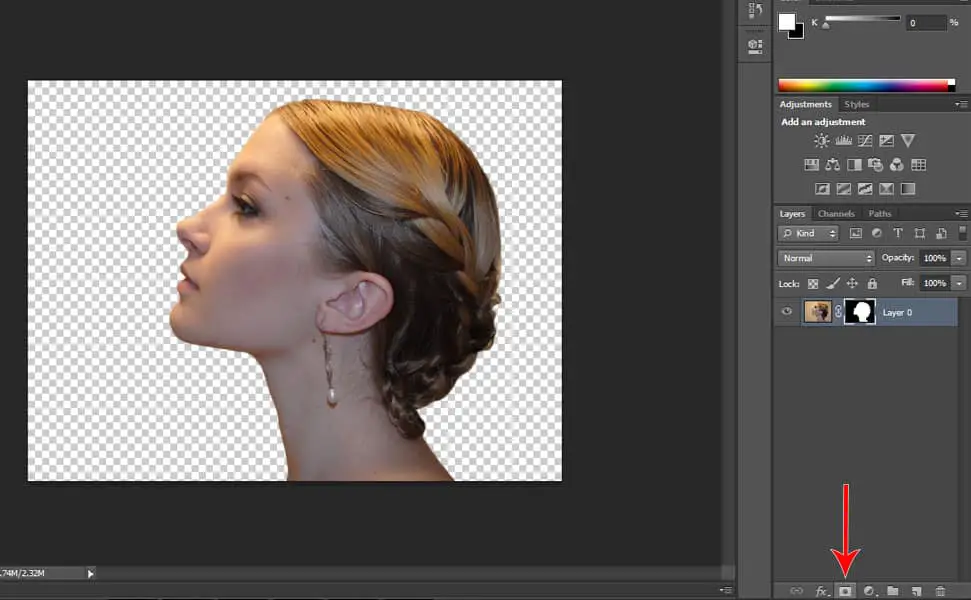
Crop the model from the background by selecting the model layer then click the ‘Add a Layer Mask’ icon, located below the layer’s tab as seen in the picture.

3. Resize the Canvas

16 Step by Step Smoke Effect Tutorial in Photoshop
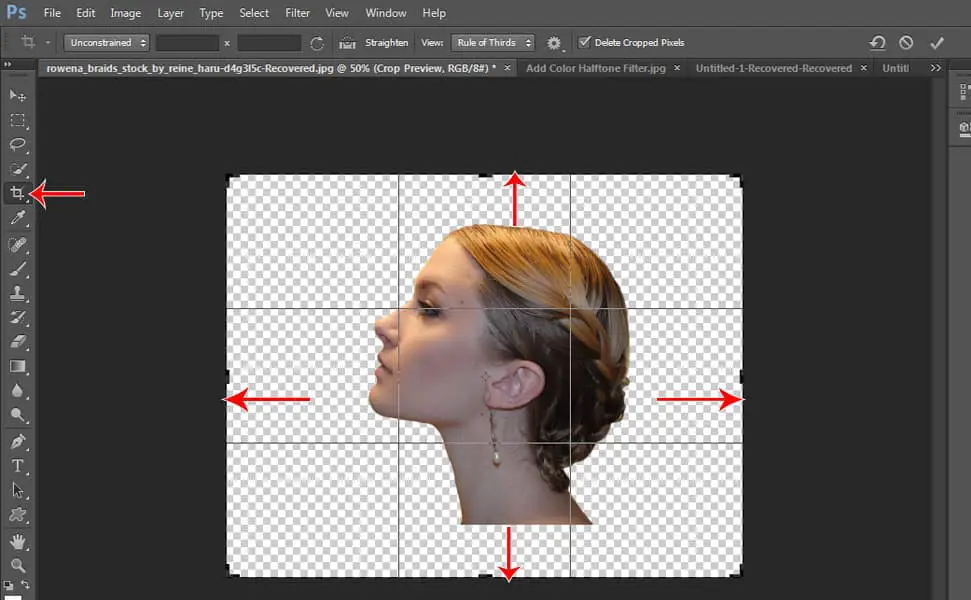
By selecting the crop tool, expand the image’s canvas, make it wider and increase the upper and the bottom. Just drag the corners to increase the canvas.

3. Convert to Smart Object

16 Step by Step Smoke Effect Tutorial in Photoshop
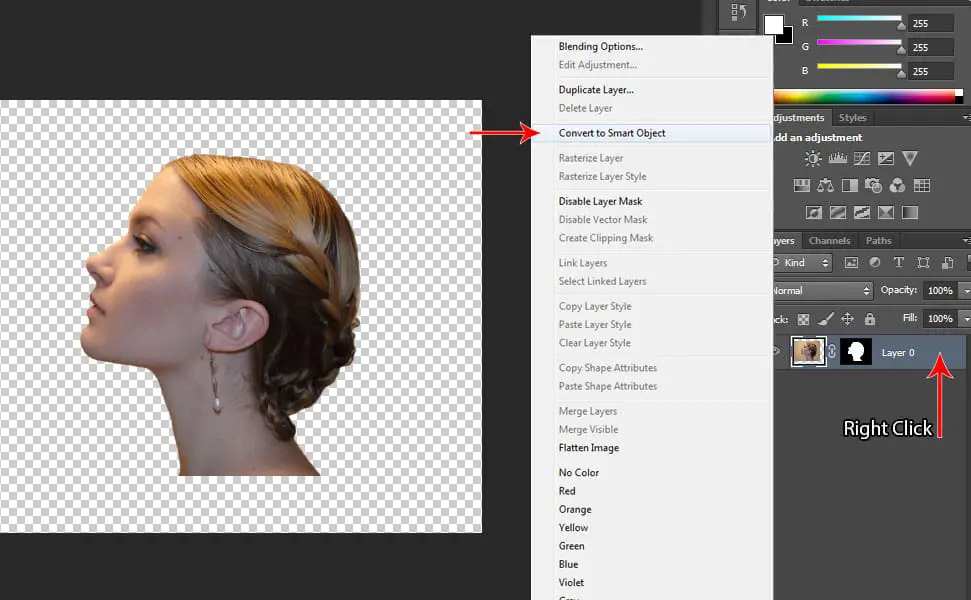
Right-click the layer then select ‘Convert to Smart Object’.

4. Resize the Model Image

16 Step by Step Smoke Effect Tutorial in Photoshop
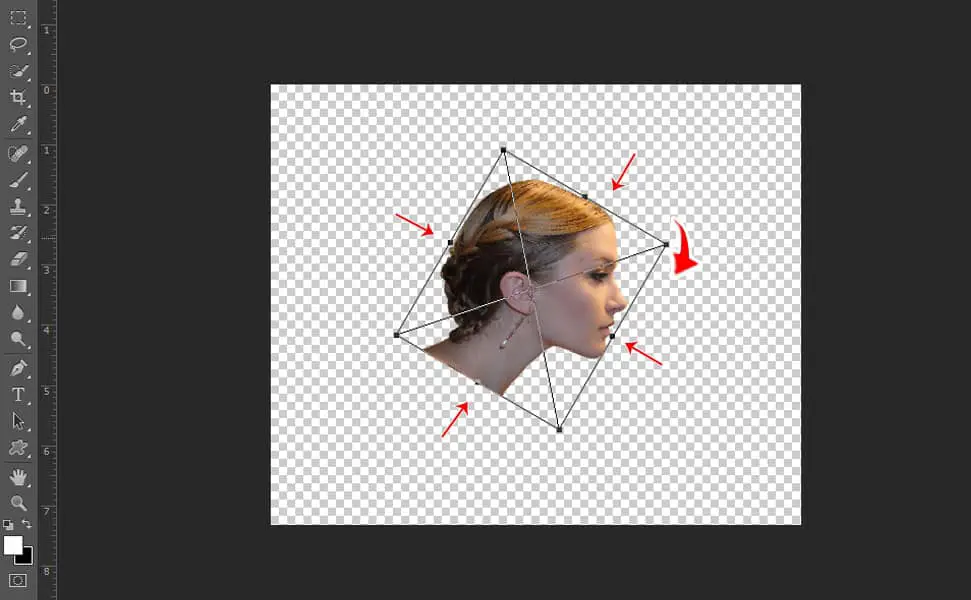
Make it a bit smaller by pressing CTRL + T while holding ‘Shift’ on your keyboard to retain the proportion, this way we’ll have space for our effects later, then right click and select ‘Flip Horizontal’ and rotate it a little bit by pressing ‘Shift’ then click the sides and find the rotate cursor and drag it around 30 degree angle then press enter.

5. Make a Gradient Fill Background

16 Step by Step Smoke Effect Tutorial in Photoshop
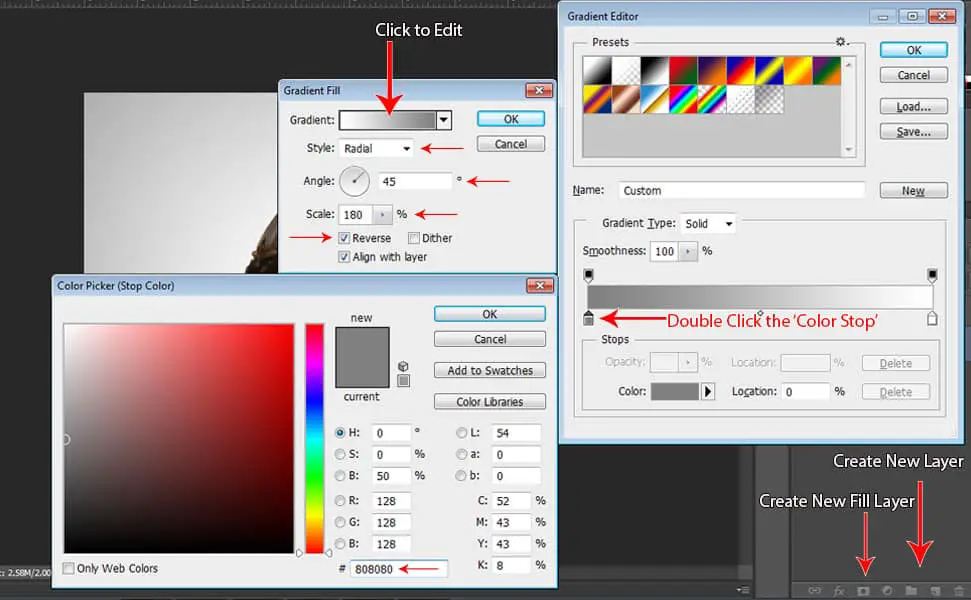
Add a new layer for the background by pressing the ‘Create New Layer’ icon, located below the layer’s tab then drag the new layer you created just below the model’s layer. Next is, click on ‘Create New Fill Layer’ icon located on the left side of the ‘Create New Layer’ icon then select ‘Gradient’. Then select the black and white gradient then change the black color to 808080 by double-clicking the ‘Color Stop’ and change the color number. Then set the ‘Angle’ to 45 degrees, 180 for ‘Scale’, then check the ‘Reverse’ box, then choose Radial for ‘Style’.

6. Duplicate the Model Layer

16 Step by Step Smoke Effect Tutorial in Photoshop
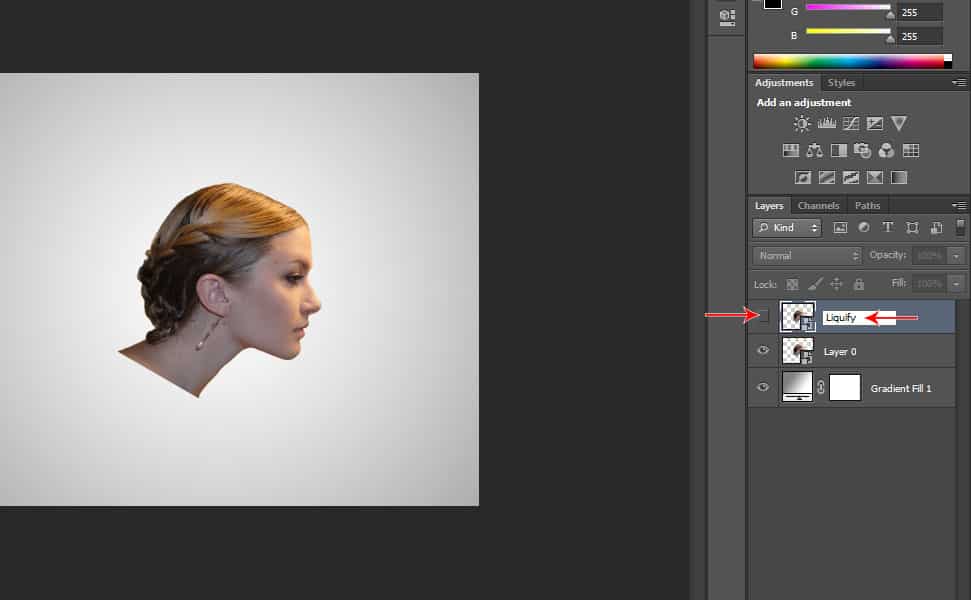
Press CTRL+J to duplicate the model’s layer then rename it to ‘Liquify’. We’re gonna need this ‘Liquify’ layer for the effects later. For now, let’s just hide the visibility of the ‘Liquify’ layer by unchecking the visibility box located at the left side of the layer.

7. Add Gradient Map Fill Layer

16 Step by Step Smoke Effect Tutorial in Photoshop
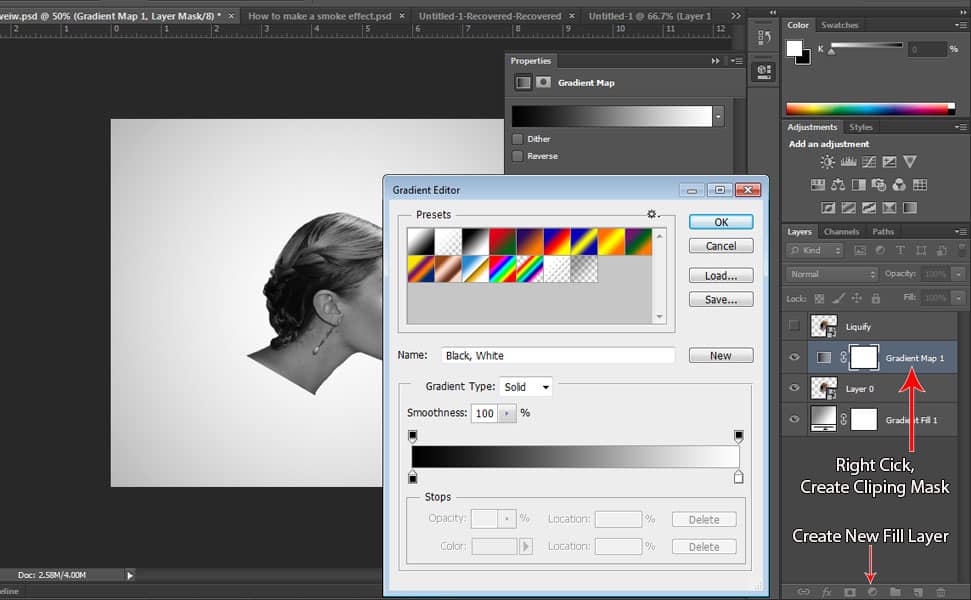
Select the model layer then click the ‘Create New Fill Layer’ icon and select ‘Gradient Map’ then choose the black and white gradient. After that clip it to the model layer by right-clicking on the ‘Gradient Map Layer’ that you just created then select ‘Create Clipping Mask’.

9. Add Black and White Fill Layer

16 Step by Step Smoke Effect Tutorial in Photoshop
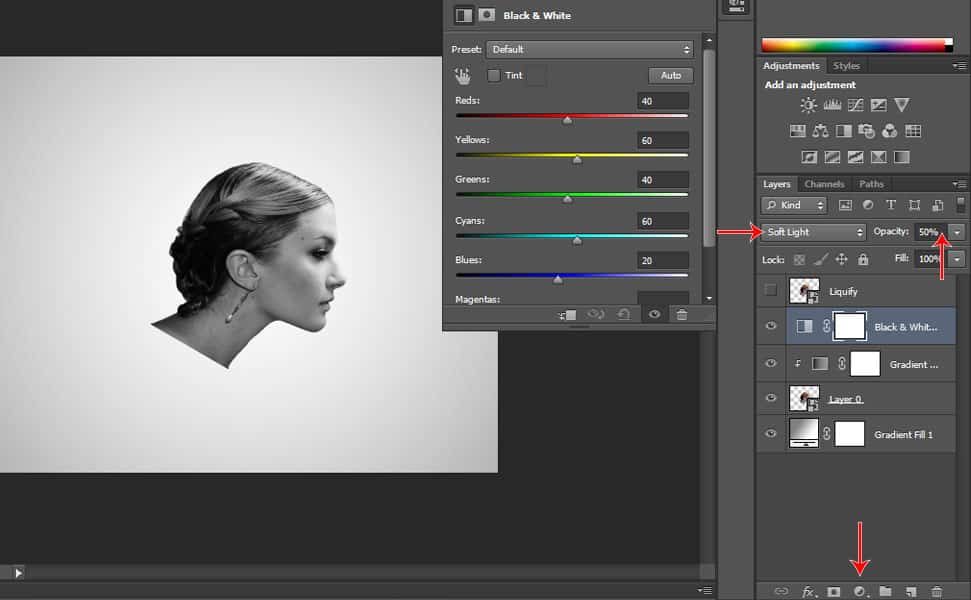
Go to ‘Create New Fill Layer’ again but this time, select ‘Black and White’ then change the Blending Mode to ‘Soft Light’ and change the Opacity to 50% as shown in the picture. Then right-click on the Black & White Layer then select ‘Create Clipping Mask’.

11. Apply a Black Layer Mask

16 Step by Step Smoke Effect Tutorial in Photoshop
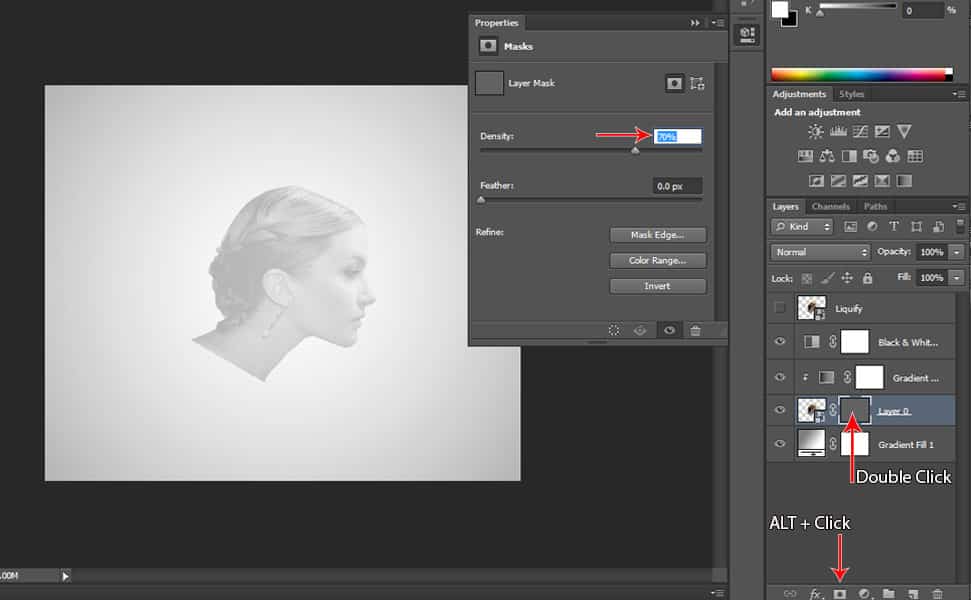
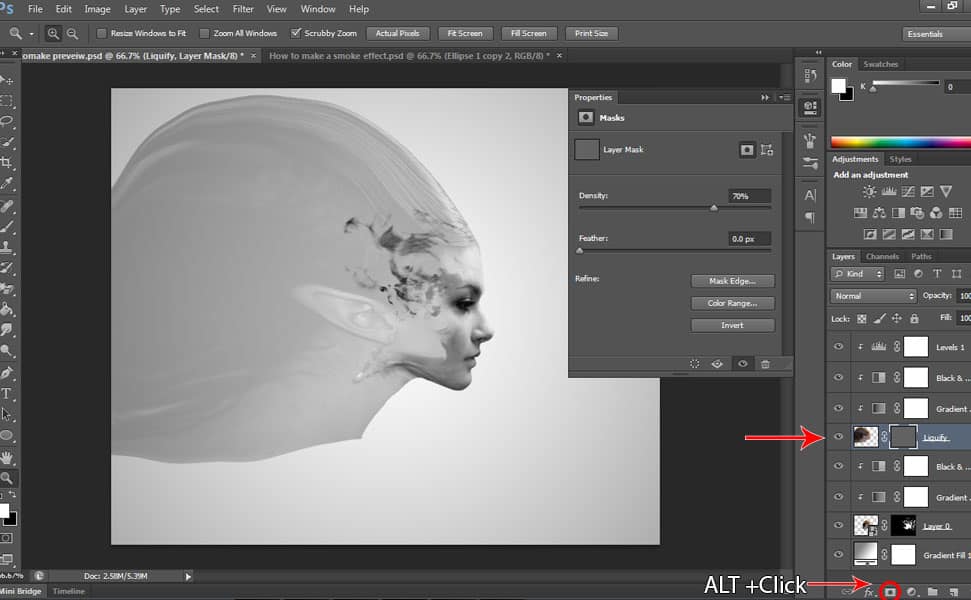
Click on the Model Layer then Press Alt + Click on the ‘Add Layer Mask’ icon to apply a black layer mask on the model layer. I applied a technique where I can see a little bit of the model’s face by double-clicking on the layer mask then change the ‘Density’ to 70% so I will be able to see which part of the face I am painting my smoke brush.

12. Brush off a bit of the Model’s Face

16 Step by Step Smoke Effect Tutorial in Photoshop
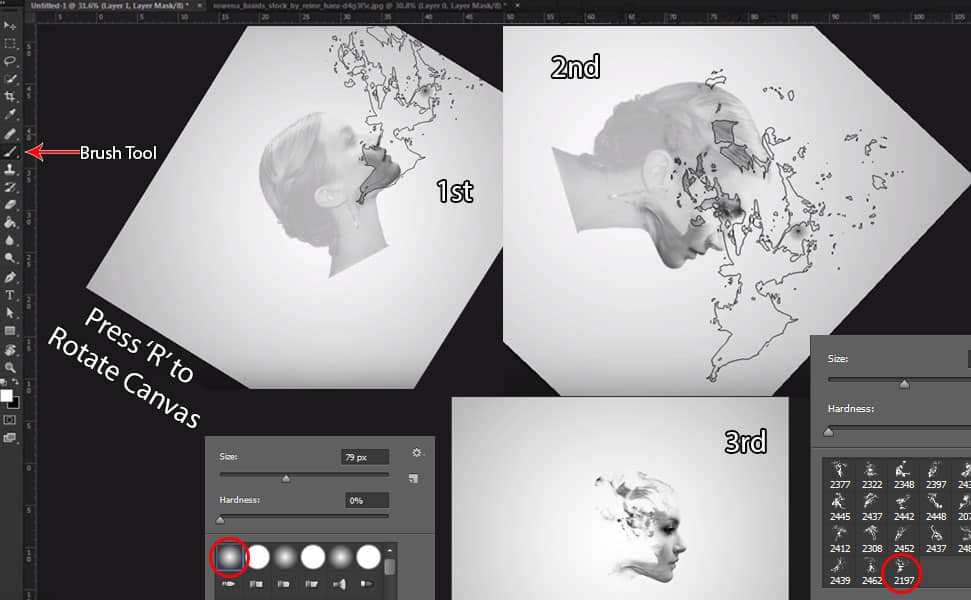
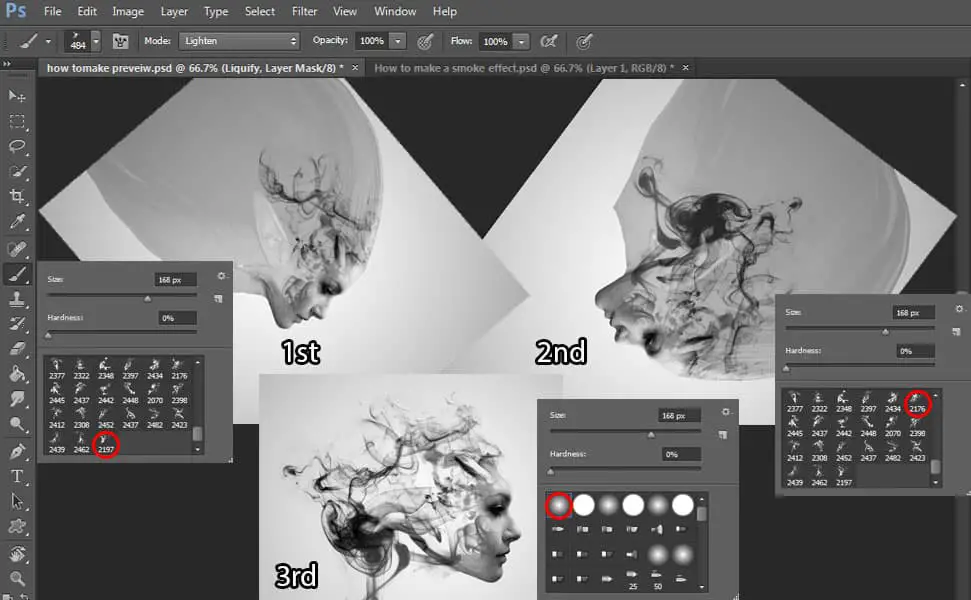
Click the Brush Tool then select 2197 Smoke Brush you downloaded from here. (if you don’t know how to load your brushes check this 13 Step by Step Dispersion Effect Tutorial in Photoshop  @ step 11 will teach you how to load brushes that you just downloaded.) It’s up to you how you want it to look like but I like to rotate the canvas by pressing R then brush the model’s face as shown in the picture. As you can see first, I brushed at the mouth area, 2nd I brushed around the eyes then the 3rd one, I changed the layer mask’s density back to 100% then brush off the eyes and nose to reveal it using a Soft Round Brush.

13. Duplicate the Fill Layers

16 Step by Step Smoke Effect Tutorial in Photoshop
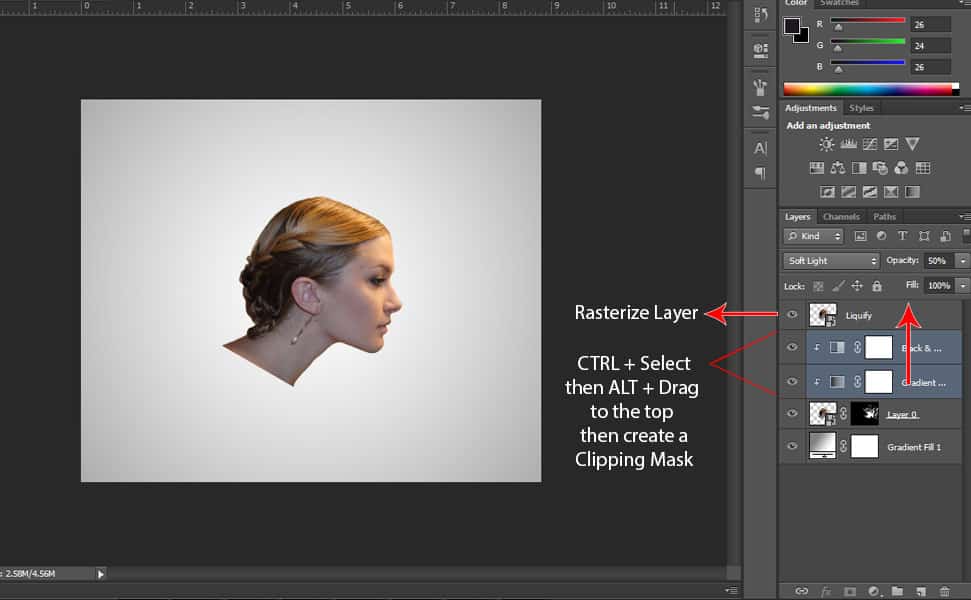
The first thing to do is make the liquify layer visible by clicking the visibility box located at the left side of the liquify layer. Then duplicate the Gradient Map and Black and white Fill Layer by pressing CTRL + select both layers then press ALT then drag it to the top of ‘Liquify’ layer. Then create a clipping mask for both fill layers by pressing CTRL + ALT + G. Next thing to do is right-click on the ‘Liquify’ layer then select ‘Rasterize Layer’.

14. Add ‘Levels’ Layer

16 Step by Step Smoke Effect Tutorial in Photoshop
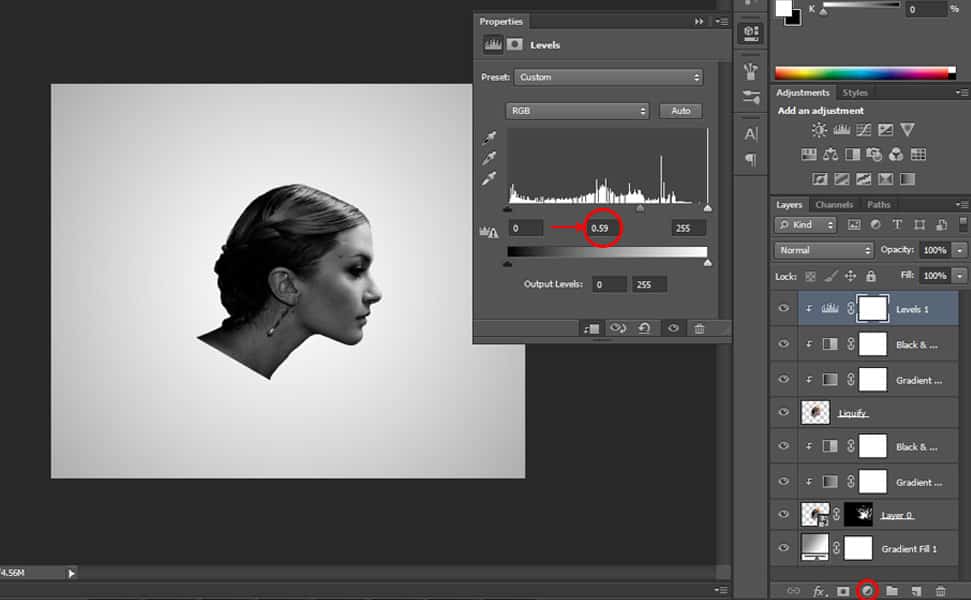
To make it a little bit darker, add a new fill layer by clicking on the ‘Create New Fill’ icon located below the layer tab then select ‘Levels’ then make it a little bit darker by typing 0.59 at the mid-level as shown in the picture.

14. Liquify the ‘Liquify’ Layer

16 Step by Step Smoke Effect Tutorial in Photoshop
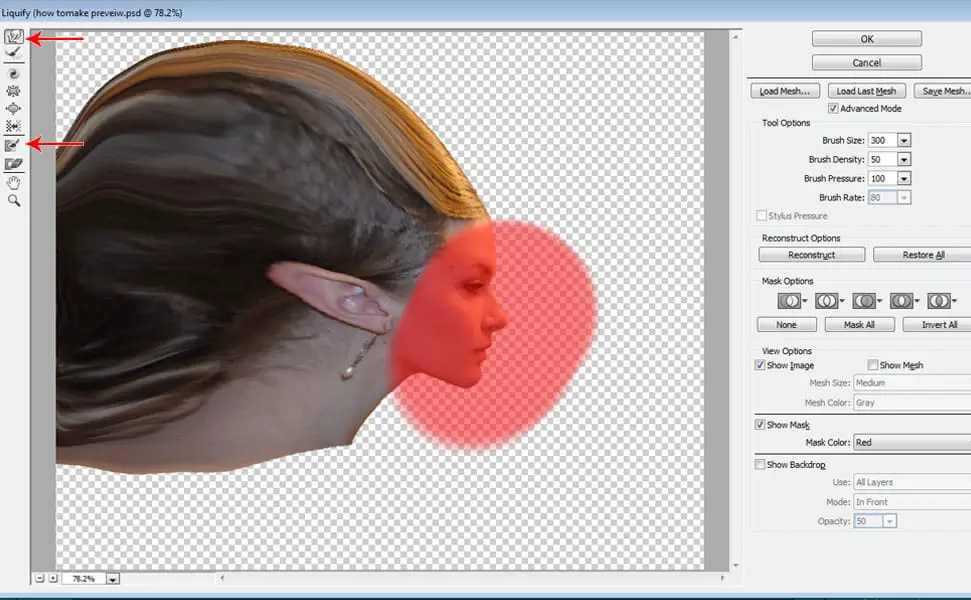
Now we’re ready to liquify our ‘liquify’ layer so make sure you select the liquify layer then go to Filter tab then select ‘Liquify’ (for shortcut press Shift + CTRL + X). Select the ‘Freeze Mask Tool’ and brush it on the face so that when we use ‘Forward Warp Tool’ later, you won’t be able to warp the face. Then select ‘Forward Warp Tool’ and warp the left side of the head and spread it to the sides as shown in the picture.

15. Add a Black Layer Mask

16 Step by Step Smoke Effect Tutorial in Photoshop
Select the ‘Liquify’ layer then Press ALT + click the ‘Add Layer Mask’ icon located below the layer tab, then change the ‘Density’ by double-clicking the black layer mask then change the ‘Density’ to 70% so you will know where to brush your smoke brush for the effects.

16. Use the Smoke Brush

16 Step by Step Smoke Effect Tutorial in Photoshop
After creating the black layer mask, select the 2482 Smoke Brush then brush it off the liquify black layer mask as shown in the 1st picture, again I rotated the canvas then used 2176 Smoke Brush for the 2nd picture then I changed back the layer mask’s density to 100%. Then I choose the soft round brush and change the foreground to white then brush off a little at the nose, mouth, and eyes to make it a bit clear.

So we’re finally done! I hope you accurately followed the step by step smoke effect tutorial and if you have any questions, feel free to comment below.
16 Incredible Fish Hook Tattoos

When thinking of tattoos, fish hooks may not be the first thing that comes to mind. However, these designs are actually very interesting, and often surprisingly impressive. Fortunately, for those who like to add their own spin on the designs they have tattooed on them, these tattoos are easily customizable and very fun to add to. So, whether you are looking to get a fish hook tattoo for yourself, or just wanting to scroll through some neat designs, you have certainly come to the right place.

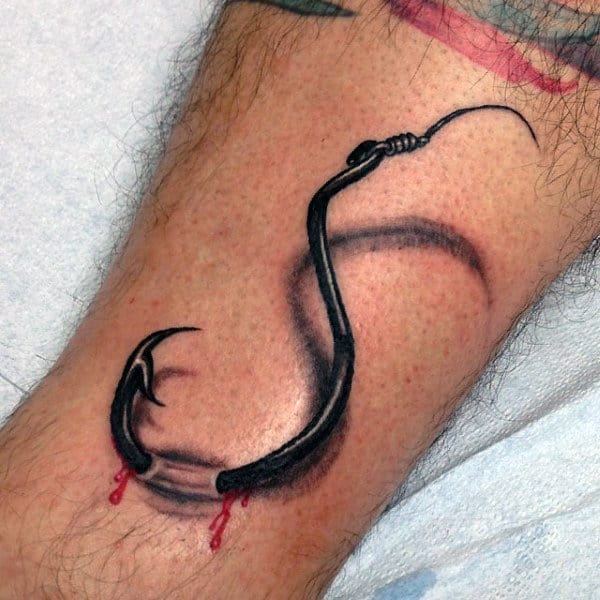
1. A Neat Black Fish Hook, Going Right Through The Skin Of The Wrist

Not only is this one colored in and shadowed very nicely, but it features the bottom of the fish hook going directly through the skin.

A Neat Black Fish Hook, Going Right Through The Skin Of The Wrist

2. Another Very Detailed, Well Done Fish Hook Tattoo, Going Right Through The Skin Of The Wrist

Similar to the last one, this design features a simple, yet aesthetically pleasing fish hook tattoo, hooked through the bottom of his forearm and wrist.

Another Very Detailed, Well Done Fish Hook Tattoo, Going Right Through The Skin Of The Wrist

3. A Very Neat Fish Hook Tattoo, With A Worried Worm Hanging Off Of It

A Very Neat Fish Hook Tattoo, With A Worried Worm Hanging Off Of It

4. A Fish Hook Chest Piece Tattoo, Done Solely In Dark Grey Ink

This one not only shows how nice fish hooks sit across the chest, but they prove that sometimes even simple tattoos can still look great.

A Fish Hook Chest Piece Tattoo, Done Solely In Dark Grey Ink

5. A Very Deeply Sunken In Fish Hook

Well, this one is certainly shaded well, and also looks extremely painful!

A Very Deeply Sunken In Fish Hook

6. An Incredibly Unique Fish Hook Forearm Tattoo

As you can see with this design, customizing your fish hook tattoo can be easy, and also tends to look great!

An Incredibly Unique Fish Hook Forearm Tattoo

7. A Heartfelt Fish Hook, With Three Different Hooks

Featuring the word “Dad”, and the dates “1940-2015”, this tattoo is certainly meaningful, and looks great with three separate hooks.

A Heartfelt Fish Hook, With Three Different Hooks

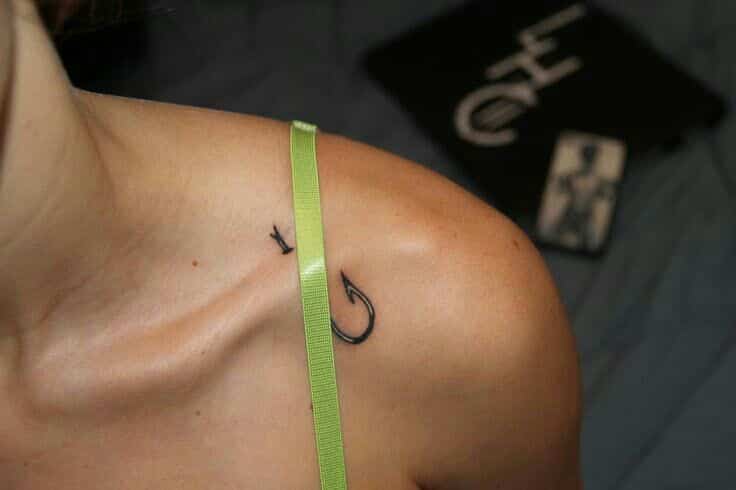
8. A Very Nicely Placed Fish Hook Collarbone Tattoo

Wow, what a perfect place for a fish hook tattoo. I would never have even thought of this!

A Very Nicely Placed Fish Hook Collarbone Tattoo

9. Two Matching Fish Hook Heart Foot Tattoos, One Saying “Believe”, And The Other Saying “Dream”

A great choice for anyone wanting to get a matching fish hook tattoo with a friend or loved one!

Two Matching Fish Hook Heart Foot Tattoos, One Saying “Believe” And The Other Saying “Dream”

10. An Extremely Colorful Fish Hook, With Three Separate Hooks, A Dog Tag, And Some Additional Imagery Around It

A very neat design that is certainly nicely done, and perhaps the most unique tattoo on this entire list!

An Extremely Colorful Fish Hook, With Three Separate Hooks, A Dog Tag, And Some Additional Imagery Around It

11. Two Small Fish Hooks, Held Together To Make A Heart

These are also very heartfelt, and are likely the tattoos of a father and a daughter. How sweet!

Two Small Fish Hook Tattoos, Held Together To Make A Heart

12. A Fish Hook Infinity Tattoo

Very nice, and another great example of just how easy these designs are to customize and add some originality too!

A Fish Hook Infinity Tattoo!

13. A Nice Fish Hook Four Leaf Clover Tattoo Design, Placed On The Back Of The Neck

Not only is this one a great choice for those who like fish hooks, but it is a great choice for those who are Irish as well!

A Nice Fish Hook Four Leaf Clover Tattoo Design, Placed On The Back Of The Neck

14. A Nice Heart Shaped Fish Hook Forearm Tattoo Design, Reading “Dad XOXO”

I am assuming by the content of this design, him and his Dad used to go fishing together…

A Nice Heart Shaped Fish Hook Forearm Tattoo Design, Reading “Dad XOXO”

11 Funny Lion Memes, Sure To Make You LOL

Lions aren’t normally animals you think of as being “funny”, however, the lions memes that we have posted below should certainly make you laugh…a lot! They are compiled with a lot of funny lion facial expressions, hilarious quotes, and some even feature additional animals that are just as funny as the lions. So, if you are looking for a good laugh, then you have certainly come to the right place.

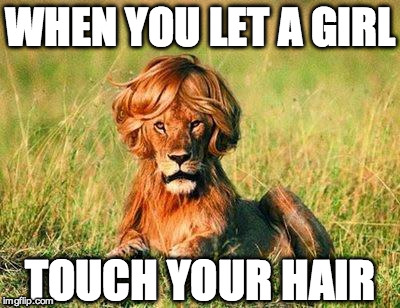
1. “When You Let A Girl Touch Your Hair”

Pretty funny, and also pretty accurate!

“When You Let A Girl Touch Your Hair”

2. “Excuse Me, Sir You Dropped This…Oh, Why Are You Running?”

Well I don’t know about you, but I’m pretty sure that I would most certainly be running too!

“Excuse Me, Sir You Dropped This…Oh, Why Are You Running?”

3. “Don’t Listen To Him, He’s Lion”

This one is slightly overused, but still very funny…

“Don’t Listen To Him, He’s Lion”

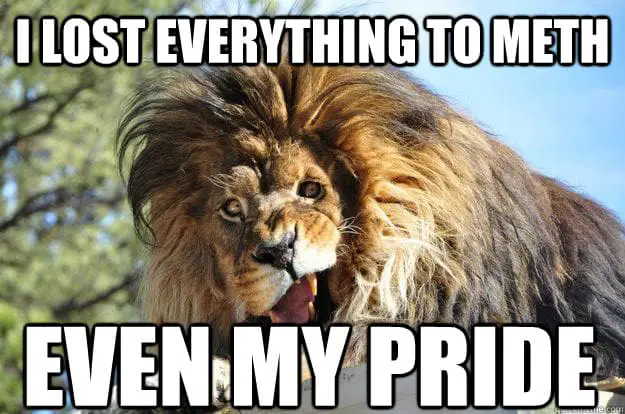
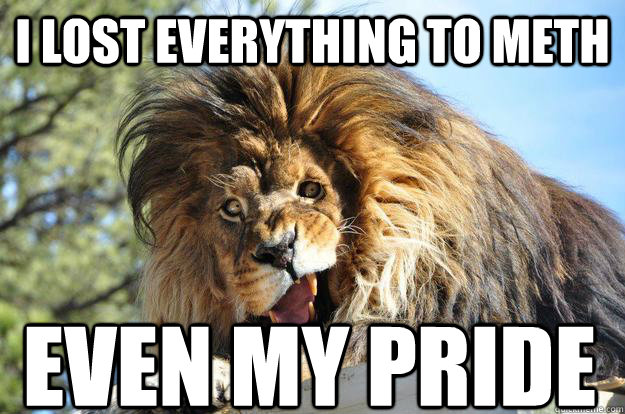
4. “I Lost Everything To Meth, Even My Pride”

Well apparently even lions can get addicted to meth…

“I Lost Everything To Meth, Even My Pride”

5. “I Hate To Interfere, But You Really Should Look Behind You, Lion”

This meme is funny to look at, but I’m sure the lion in this picture got trampled pretty badly…

“I Hate To Interfere, But You Really Should Look Behind You, Lion”

6. “Do You Even Lift Bro? I Know You Lion!!”

Believe it or not, this is an actual, unedited photo of a lion in that position…

“Do You Even Lift Bro? I Know You Lion!!”

7. “Total Eclipse Of The Heart! OMG, Would You Please Stop!” 

Apparently (according to this photo), some lions love singing, and some lions hate signing…

“Total Eclipse Of The Heart! OMG, Would You Please Stop!”

8. “Finally Saw Lion King, Scar Is A Terrible Representation Of My People”

To be honest, I’m assuming most lions probably would be ashamed of that character…not only is he mean, but he is not very prideful at all.

“Finally Saw Lion King, Scar Is A Terrible Representation Of My People”

9. “Can We Pretend That Constellations In The Night Sky Are Our Ancestors? I Could Really Use My Dad Right Now”

Very funny, and perhaps the most well thought out meme on the entire list!

“Can We Pretend That Constellations In The Night Sky Are Our Ancestors? I Could Really Use My Dad Right Now”

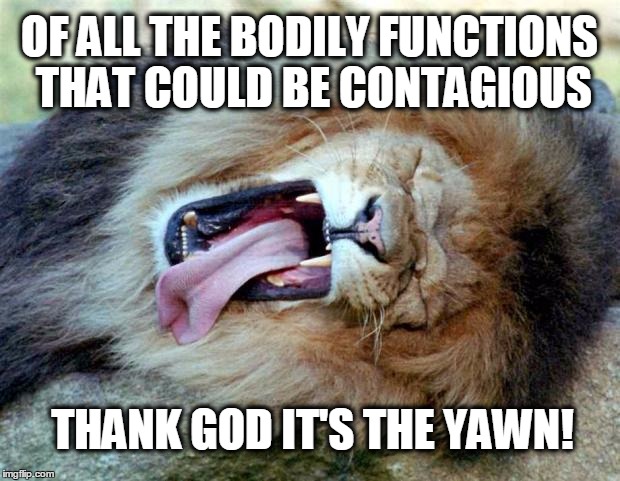
10. “Of All The Bodily Functions That Could Be Contagious, Thank God It’s The Yawn!”

“Of All The Bodily Functions That Could Be Contagious, Thank God It’s The Yawn!”

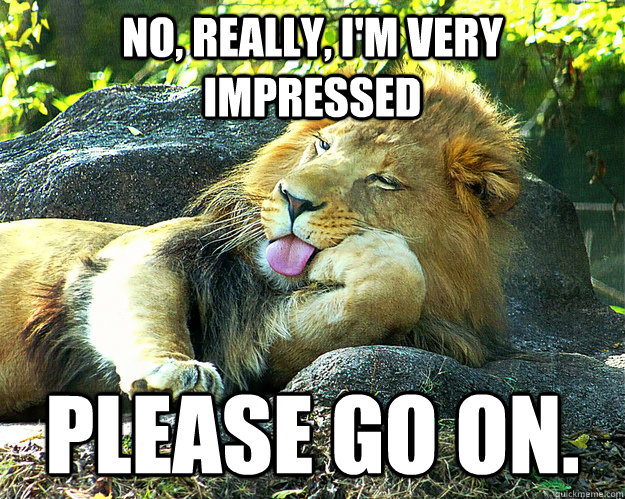
11. “No, Really, I’m Very Impressed, Please Go On.”

Believe it or not, some lions can actually be very sarcastic…something you should definitely be able to tell from this picture.

“No, Really, I’m Very Impressed, Please Go On.”

17 Step by Step Double Exposure Effect Tutorial in Photoshop

17 Step by Step Double Exposure Effect Tutorial in Photoshop

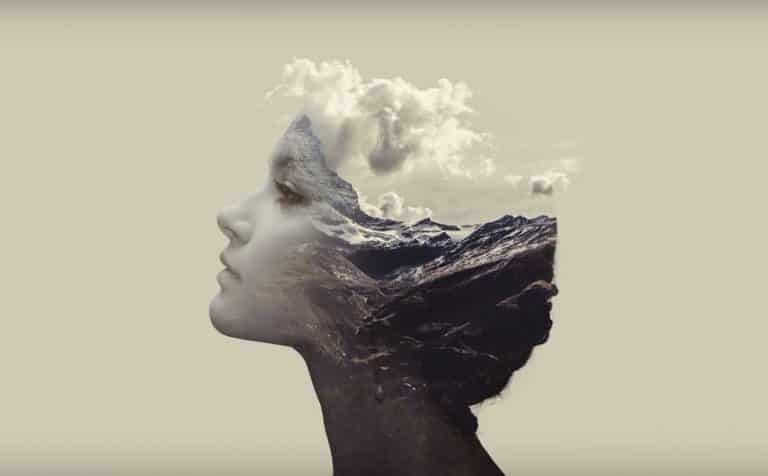
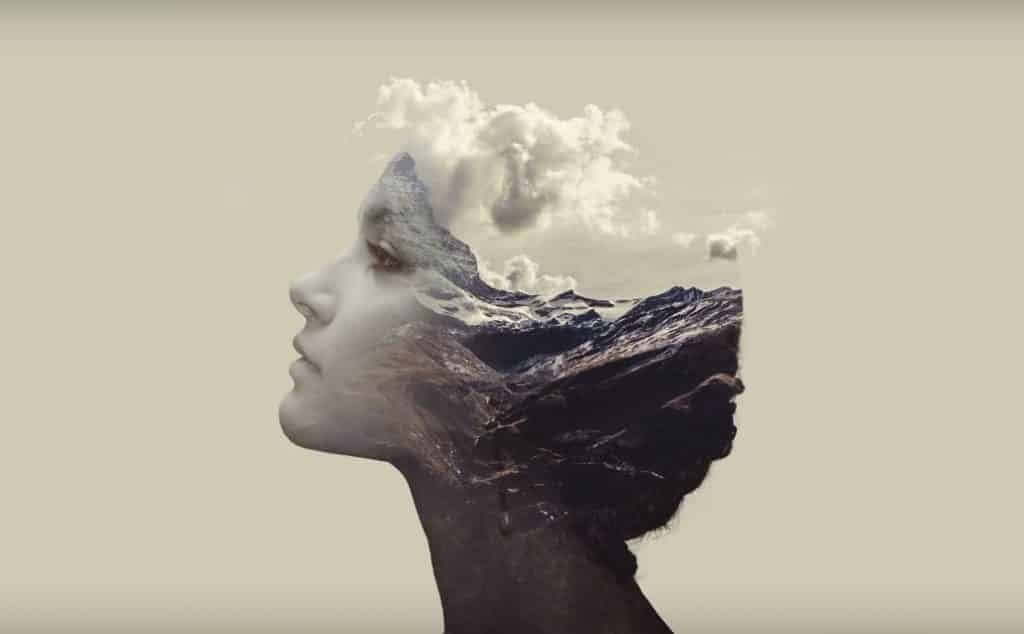
Ever watched Taylor Swift’s ‘Style’ music video? Now this tutorial that I’m going to show you is somewhat similar to that effect, except it is image based and not a video. What we call that trick in Adobe Photoshop is Double Exposure Effect.

17 Step by Step Double Exposure Effect Tutorial in Adobe Photoshop

In this article, I’m going to show you 17 step by step tutorial on how to make a double exposure effect in Adobe Photoshop. You will see how to blend images using blending modes and layer masks to get these awesome results.

Here are the images’ links, in case you want to use the same images that I am using:
Model by: http://reine-haru.deviantart.com
Image: https://goo.gl/yokmlM

Mountains by: http://getrefe.com
Download: https://goo.gl/QNGdt2

So let’s start by opening the image that we’re going to use in Adobe Photoshop.

1. Image Selection

17 Step by Step Double Exposure Effect Tutorial in Adobe Photoshop
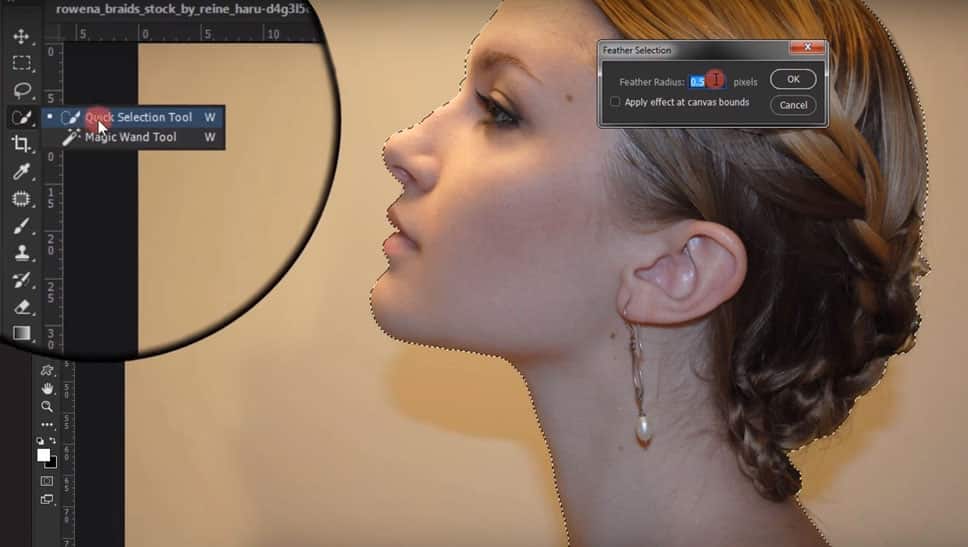
The first thing to do is to make a selection of the model. To do this, click the Quick Selection Tool, and make a quick selection of the model portrait by tracing it. After selecting it, right click then click on Feather Selection and make it 0.5 pixels and press OK.

2. Image Cropping

17 Step by Step Double Exposure Effect Tutorial in Adobe Photoshop
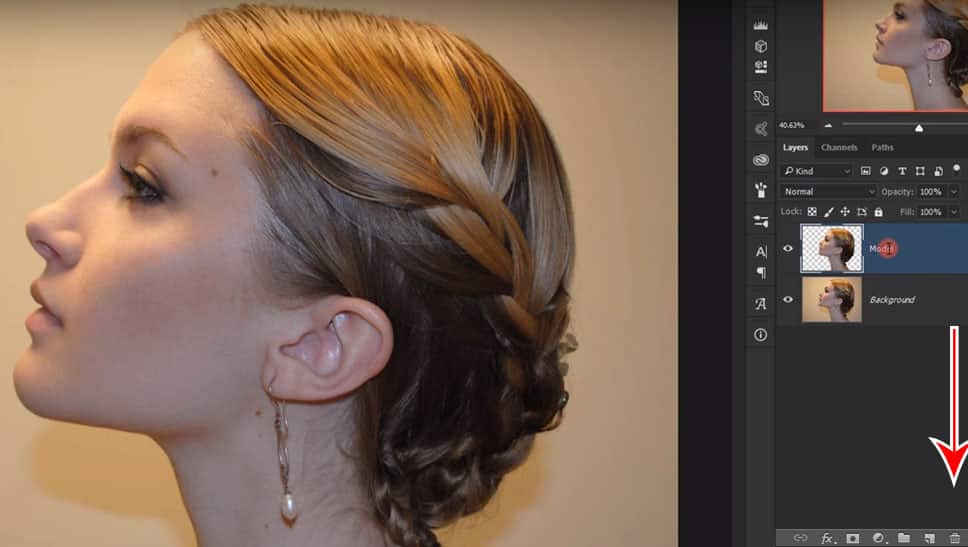
Next step is, click the model image located in layers tab which is named background, and then press Ctrl + J to get a new layer of the image that you selected. And click on the new layer that you created to rename it by double-clicking on the name then type “Model” so you won’t be confused. Then delete the layer named background by dragging it to the trash bin icon located just below the layer tab.

3. Expand the Image for the Effects

17 Step by Step Double Exposure Effect Tutorial in Adobe Photoshop
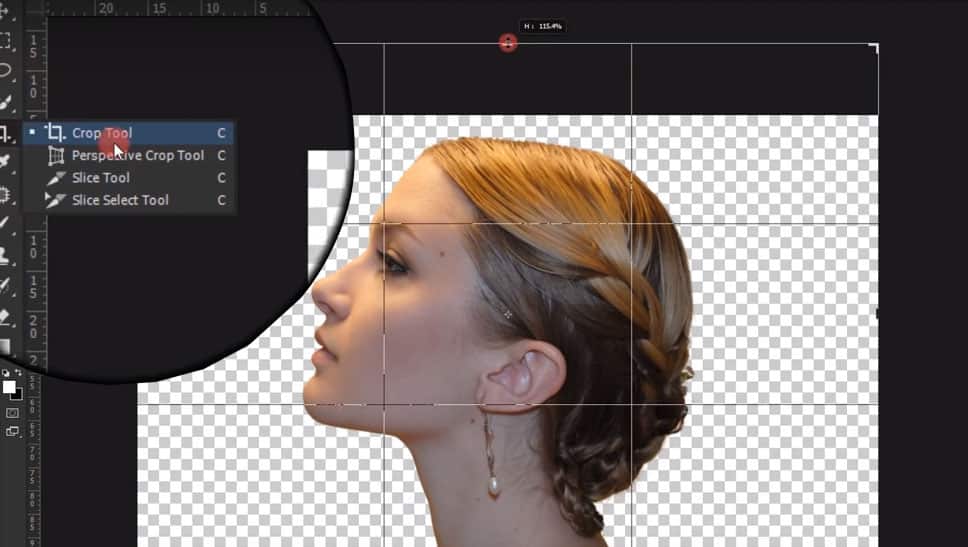
Now to make the background image bigger to have space for the effects, click on the Crop Tool, drag the sides and the upper area of the image to expand it and then press Enter on your keyboard to implement change.

4. Make a Background

17 Step by Step Double Exposure Effect Tutorial in Adobe Photoshop
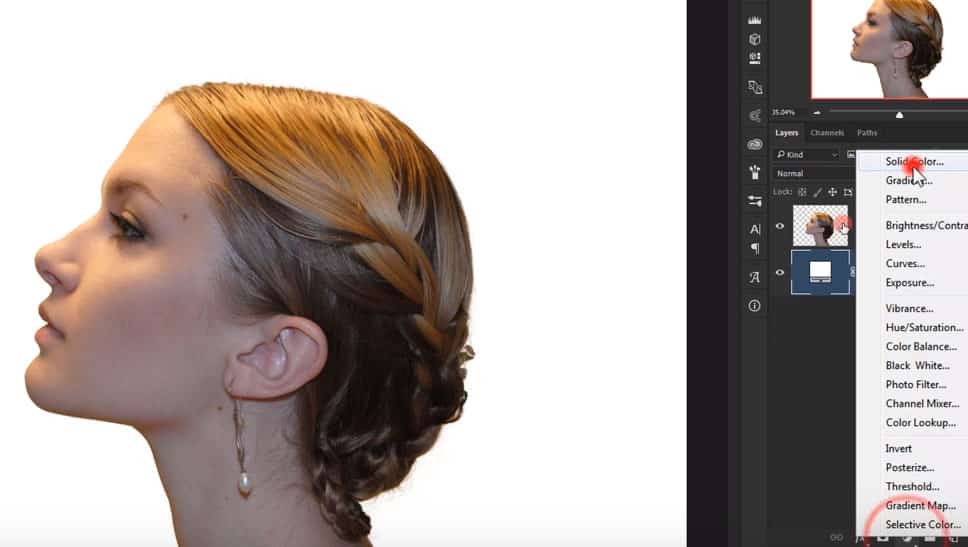
To make a white background for the image you selected, click the Adjustments button below the layer tab, the icon is circle shaped, select “Solid Color” then choose white as a background. You can rename the layer to BG for the background. Then drag the new background layer under the Model image layer, and you will see that you have created a white background for the image you cropped.

See related article: How To Change Your Background Color In Photoshop

5. Desaturate the Image to Achieve a Grey Look

17 Step by Step Double Exposure Effect Tutorial in Adobe Photoshop
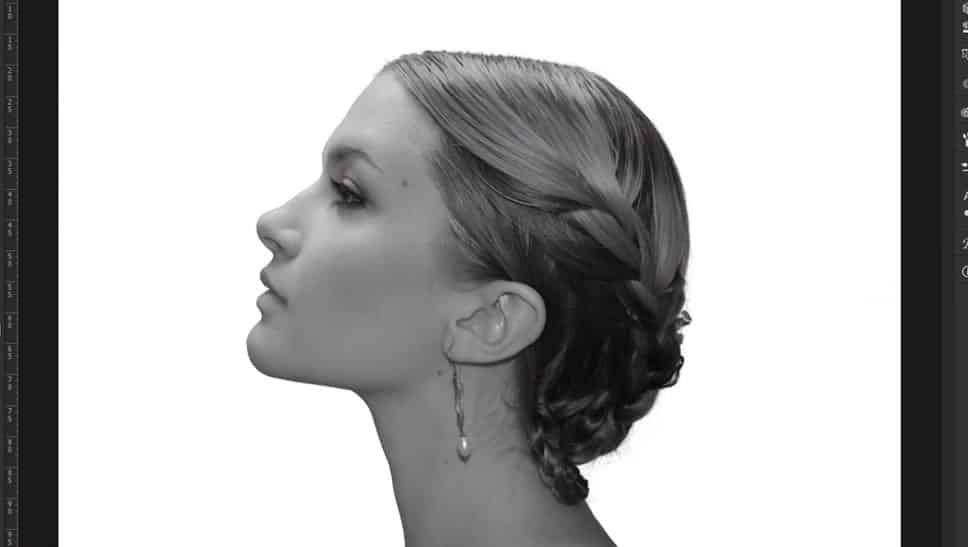
To desaturate the model image, click on the model image layer then press on your keyboard CTRL + SHIFT + U. You will see that the model’s image is now desaturated.

6. Combine the Images

17 Step by Step Double Exposure Effect Tutorial in Adobe Photoshop
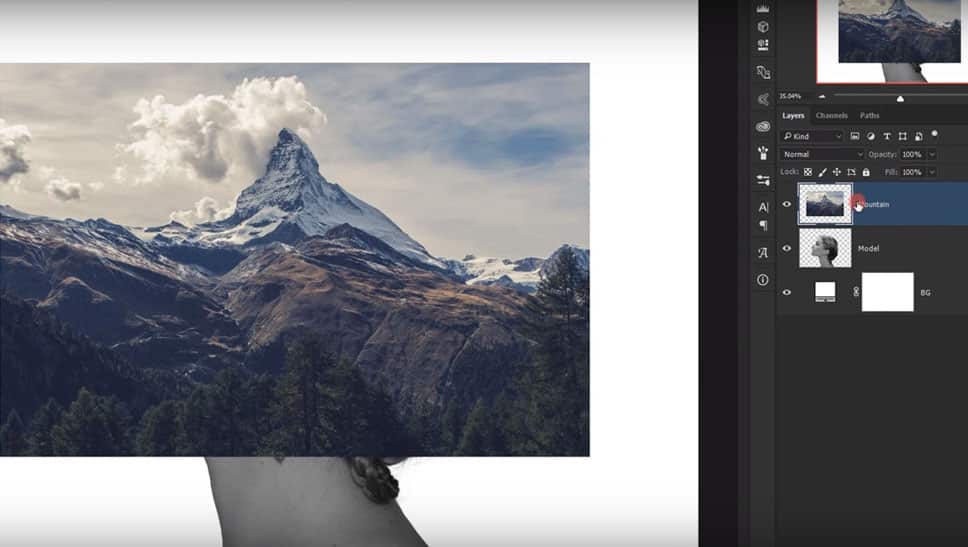
Next step is to open the second image that you will be using and then copy and paste it to the model’s tab. To copy it, you have to select it first by pressing on your keyboard CTRL + A, after selecting it, press CTRL + C to copy the image and then go to your model tab to paste it by pressing CTRL + V.

7. Changing the Opacity

17 Step by Step Double Exposure Effect Tutorial in Adobe Photoshop
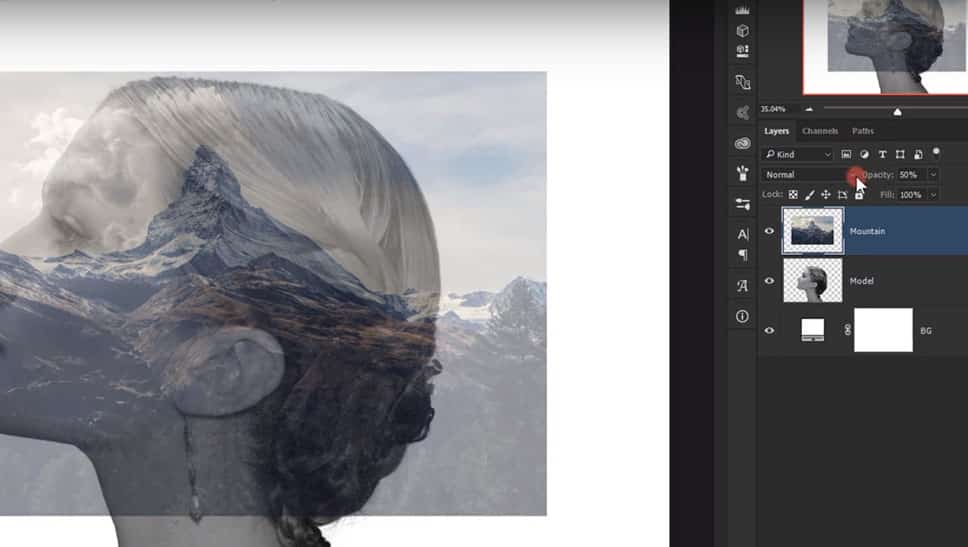
To change the opacity of the mountain image, click on the mountain layer located in layer’s tab and at the upper right corner click on the ‘Opacity’ to change its opacity to 50%. This way you can see where you want to place the clouds before you start working on it.

8. Position the Mountain Image

17 Step by Step Double Exposure Effect Tutorial in Adobe Photoshop
To achieve a better look on the mountain image, I flipped the image horizontally to make the clouds face the other direction. So to do this, you have to press on your keyboard CTRL + T and click Flip Horizontal to achieve it and then place the mountain image where you want it. You can also resize it by pressing CTRL + T and then press Shift on your keyboard while resizing the image this will help retain the proportion while reducing or increasing the size of the image and don’t forget to press Enter on your keyboard to implement change. Next is, change the mountain layer’s opacity back to 100%.

9. Cropping the Mountain Image

17 Step by Step Double Exposure Effect Tutorial in Adobe Photoshop
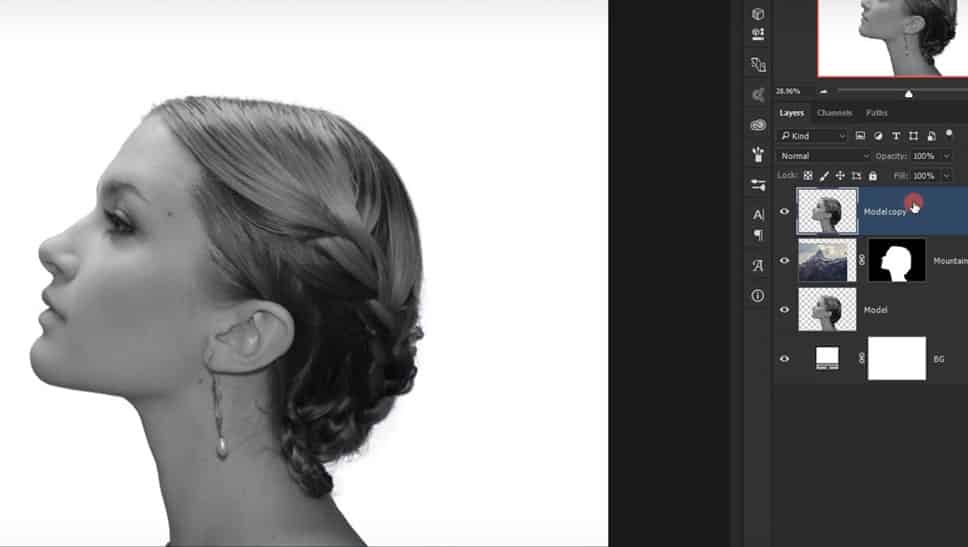
Press CTRL while clicking on the model layer image to get a selection of the cropped model then select the mountain layer and click on the ‘Add Layer Mask’ icon located just below the layer tab. You can see that you just created a ‘Layer Mask’ which you can rename it to “Mountain”.

10. Duplicate the Model Image Layer

17 Step by Step Double Exposure Effect Tutorial in Adobe Photoshop
To make a copy of the model image layer, press ALT on your keyboard while you click and drag the model layer on top of the Mountain layer

11. Changing the Blending Mode

17 Step by Step Double Exposure Effect Tutorial in Adobe Photoshop
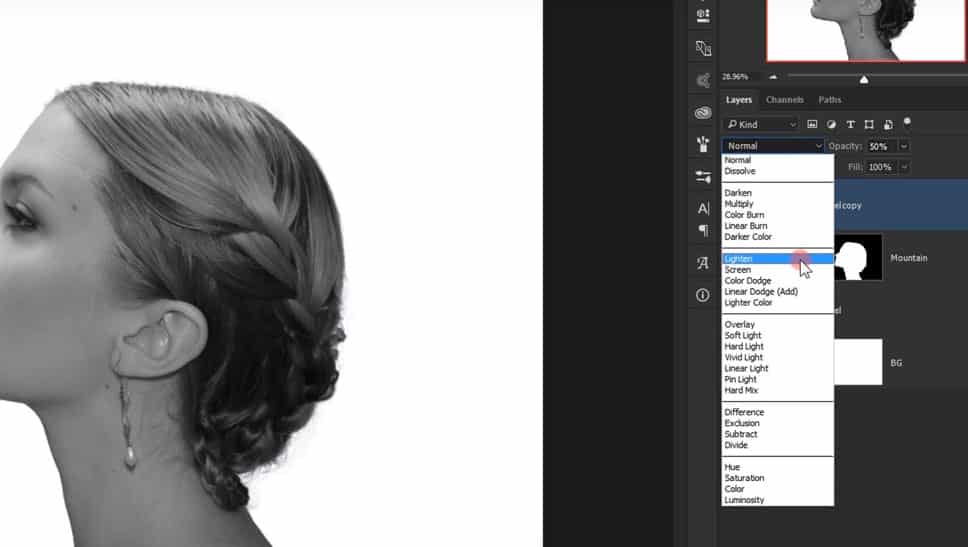
After you duplicate the model image layer, select the duplicate and change the blending mode to ‘Lighten’, you can find the button beside Opacity named ‘Normal’. Then reduce the duplicate’s opacity to 50%.

See related article: How to Create a Watercolor Effect – 11 Steps Photoshop Tutorial

12. Define the Duplicate Image

17 Step by Step Double Exposure Effect Tutorial in Adobe Photoshop
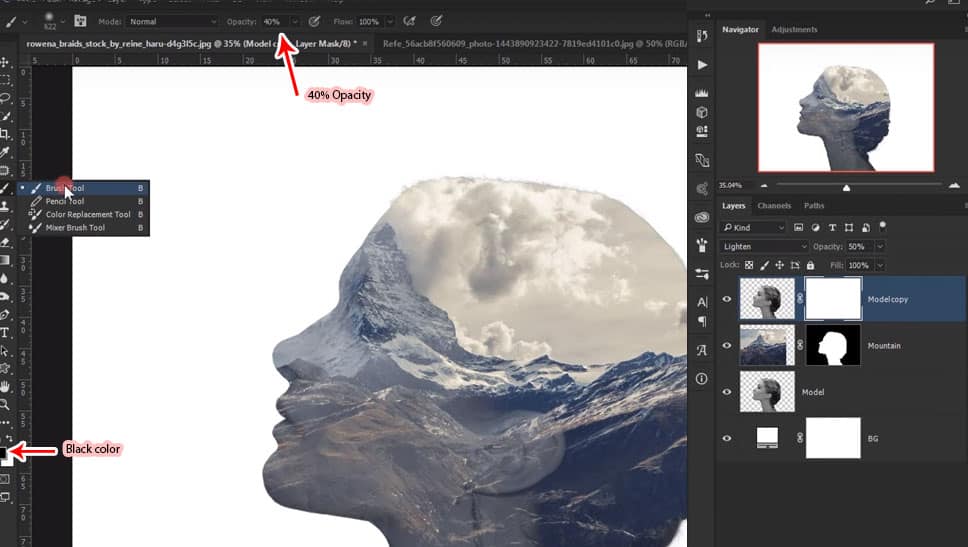
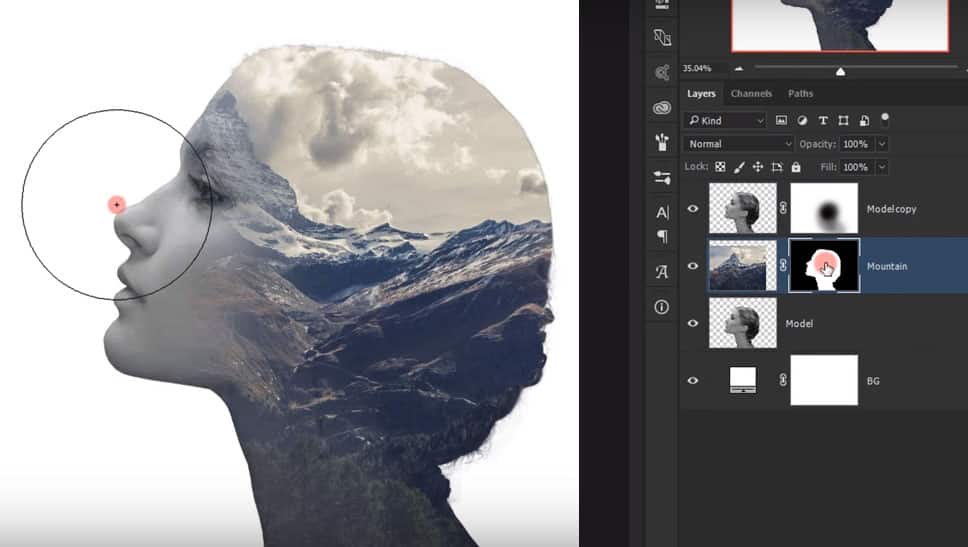
Apply a Layer mask on the duplicate model layer by selecting the duplicate model layer then click on the Vector Mask icon. To find the layer mask icon refer to Step 7 image. Then select the Brush Tool w/ 40% opacity, color black fill then start brushing a little off on the middle area of the duplicate image removing the ears and neck details.

13. Define the Mountain Image

17 Step by Step Double Exposure Effect Tutorial in Adobe Photoshop
Next step is to select the layer mask of the mountain layer, make sure it’s the layer mask not the image of the mountain so that we can define it by selecting the brush tool and start brushing off the face area to reveal the face of the model.

14. Change the Background Color

17 Step by Step Double Exposure Effect Tutorial in Adobe Photoshop
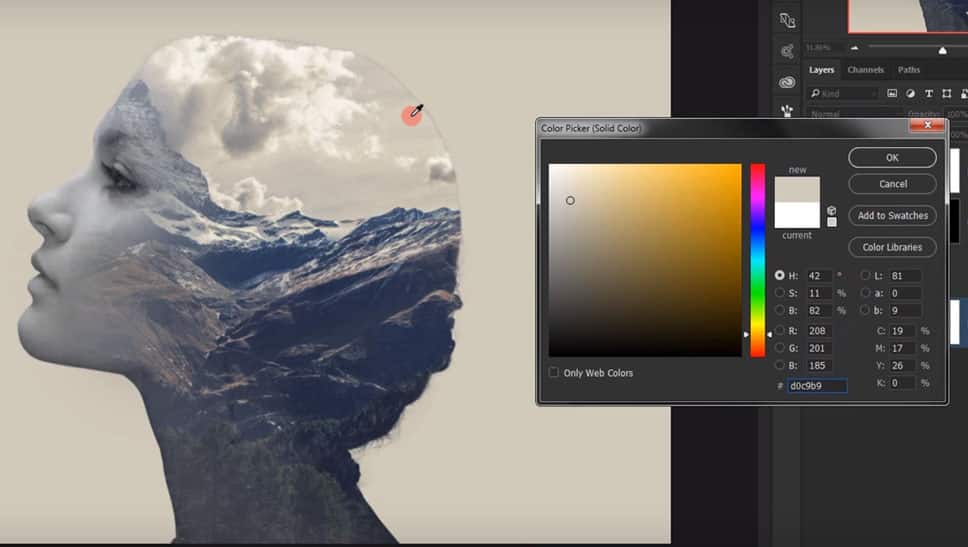
To change the background color, double click on the background layer and pick a color by hovering at the same area as shown on the image.

15. Create a Cool Effect on the Clouds

17 Step by Step Double Exposure Effect Tutorial in Adobe Photoshop
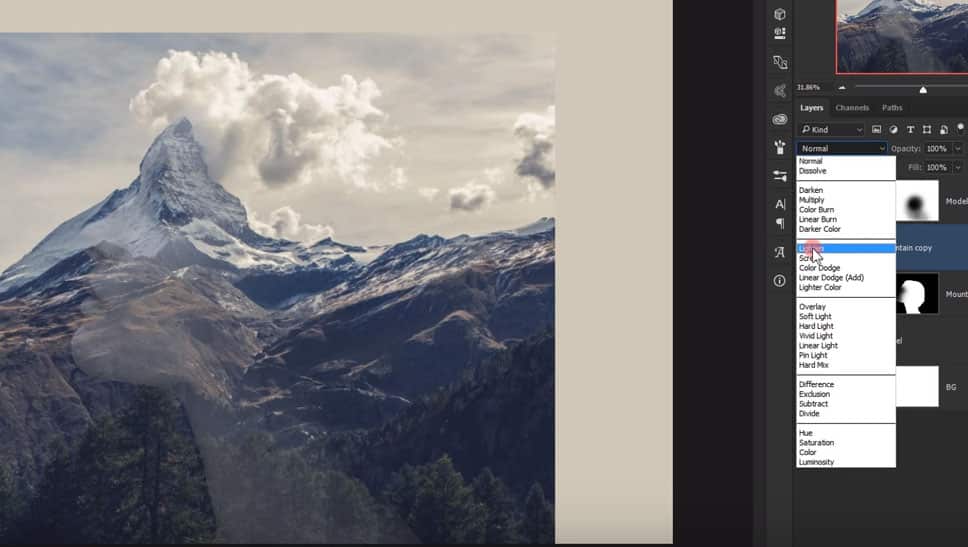
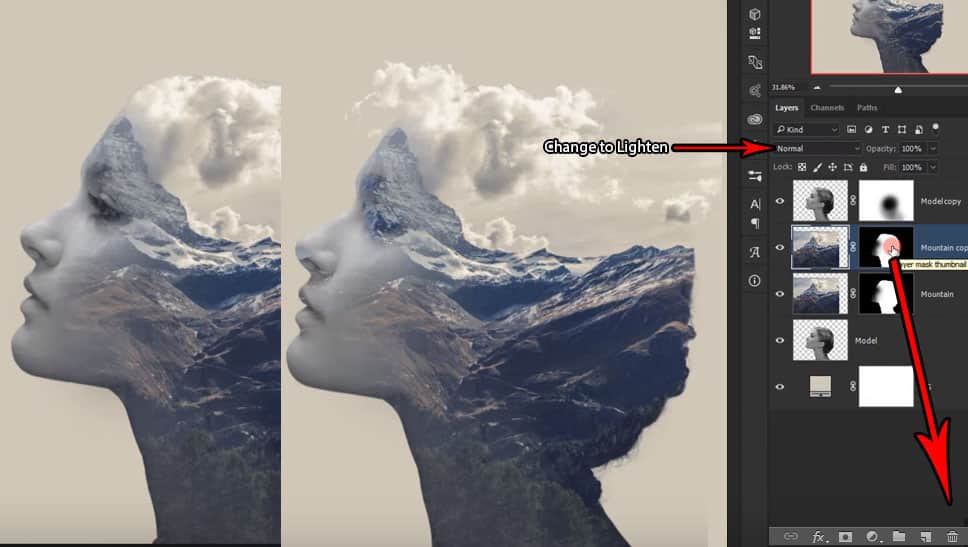
Select the Mountain layer then press CTRL + J to duplicate the Mountain layer. Then delete the mask layer by clicking and dragging it to the trash bin then press delete. Then change its blending mode to ‘Lighten’.

16. Define The Clouds Effect

17 Step by Step Double Exposure Effect Tutorial in Adobe Photoshop
Apply a black layer mask by selecting the duplicate mountain layer then press ALT on your keyboard while you click on the Vector Mask icon. Then click on the brush tool and select the white color for your brush then start brushing off the forehead and head area of the image to define it.

17. Make the Colors More Dramatic

17 Step by Step Double Exposure Effect Tutorial in Adobe Photoshop
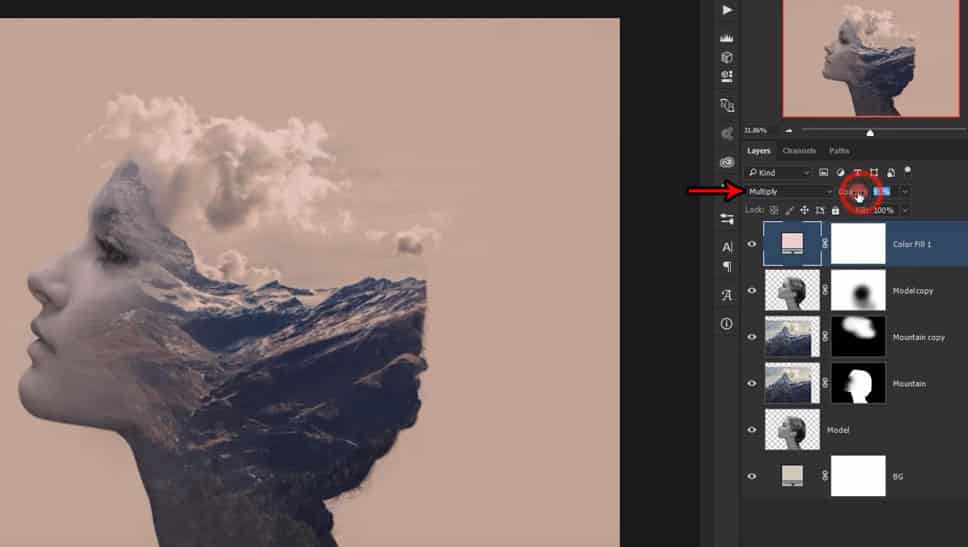
Next step is to select the top layer named model copy. Click the adjustments icon then pick Solid Color and choose the soft pink color. Then change the blending mode to ‘Multiply’ and set the opacity to 20%.

18. Add More Effects to the Image

17 Step by Step Double Exposure Effect Tutorial in Adobe Photoshop
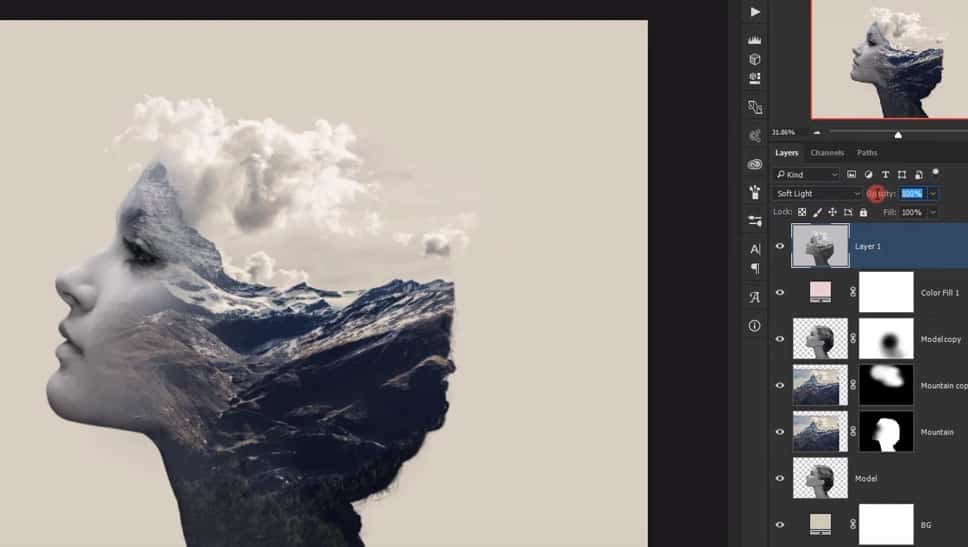
Press ALT + CTRL + SHIFT + E to merge all layers into one layer then desaturate it by pressing SHIFT + CTRL + U on your keyboard then change the blending mode to Soft light and set the opacity to 30%.

And that’s it, I hope you followed the 17 step by step tutorial on how to make a double exposure effect in Adobe Photoshop correctly on your end and get the awesome results that you expected!

12 Bad Teeth Pictures That’ll Make You Want To Brush Yours!

For most people, not brushing your teeth is one of the most uncomfortable things in the world. However, for some individuals, it is not too big of a deal. And though that may seem rather disgusting, their bad habits have certainly made for some remarkable memes. These may not be the funniest memes we’ve ever posted, but they will sure make you want to go brush your teeth immediately!

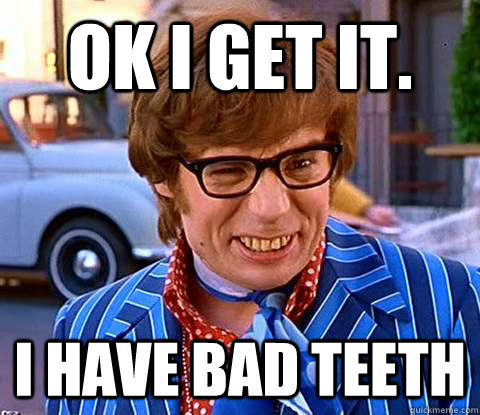
1. “Ok I Get It. I Have Bad Teeth”

To be honest, they might even be some of the worst teeth I’ve ever seen!

“Ok I Get It. I Have Bad Teeth”

2. “I Should Probably Replace My Teeth, Ain’t Nobody Got Time Fo’ That”

Well, apparently she doesn’t have time for that either…

“I Should Probably Replace My Teeth, Ain’t Nobody Got Time Fo’ That”

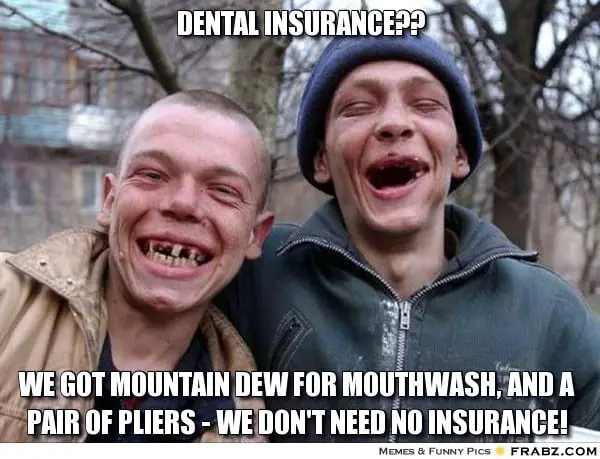
3. “Dental Insurance?? We Got Mountain Dew For Mouthwash, And A Pair Of Pliers – We Don’t Need No Insurance!”

Well these guys certainly seem to have it all figured out…

“Dental Insurance?? We Got Mountain Dew For Mouthwash, And A Pair Of Pliers – We Don’t Need No Insurance!”

4. “And You Thought His Eyebrows Were Bad? Anthony Davis’ Teeth…”

Wow, I honestly never even noticed before, but his teeth are also amongst the worst!

“And You Thought His Eyebrows Were Bad? Anthony Davis’ Teeth…”

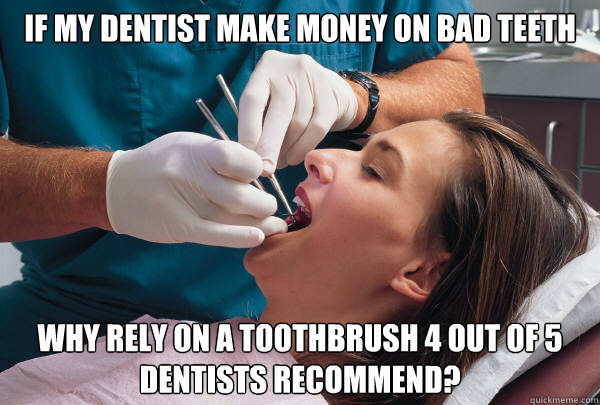
5. “If My Dentist Make Money On Bad Teeth, Why Rely On A Toothbrush 4 Out Of 5 Dentists Recommend?”

To be honest, that is actually a very good point…wouldn’t it be in their best interest to recommend one that “doesn’t” work well?

“If My Dentist Make Money On Bad Teeth, Why Rely On A Toothbrush 4 Out Of 5 Dentists Recommend?”

6. “Smokes Meth, Has Beautiful Teeth”

That’s right, Breaking Bad’s Jesse Pinkman has some of the most beautiful teeth around…despite his meth smoking habits throughout the show. How ironic!

“Smokes Meth, Has Beautiful Teeth”

7. “Her Teeth Wanna Run A Quarterback Sneak So Bad, Anyone Who Knows Me Knows My Bottom Row Of Teeth Look Like This”

Well, if that is what they are trying to do, then they are certainly in a great position for it…

“Her Teeth Wanna Run A Quarterback Sneak So Bad, Anyone Who Knows Me Knows My Bottom Row Of Teeth Look Like This”

8. “If People Could Brush Their Teeth The Entire 6 Months Between Visits Instead Of Just 5 Minutes Before Their Appointment, That’d Be Great”

Perhaps the most annoying, aggravating, and frustrating part of being a dentist!

“If People Could Brush Their Teeth The Entire 6 Months Between Visits Instead Of Just 5 Minutes Before Their Appointment, That’d Be Great”

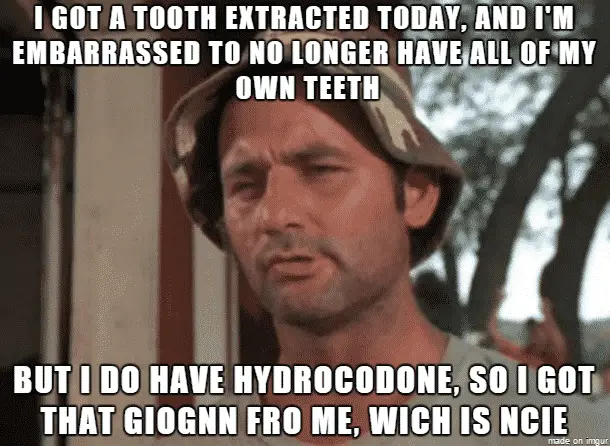
9. “I Got A Tooth Extracted Today, And I’m Embarrassed To No Longer Have All Of My Own Teeth, But I Do Have Hydrocodone, So I Got That Giognn Fro Me, Whic Is Ncie”

It might work well, but it will certainly make you talk funny…much like the poor guy in the meme picture below towards the end of his sentence.

“I Got A Tooth Extracted Today, And I’m Embarrassed To No Longer Have All Of My Own Teeth, But I Do Have Hydrocodone, So I Got That Giognn Fro Me, Wich Is Ncie”

10. “If Your Plug For Crystal Meth Has All Their Teeth, They’re The Police!”

A very good rule of thumb to go by when dealing with crystal meth…

“If Your Plug For Crystal Meth Has All Their Teeth, They’re The Police!”

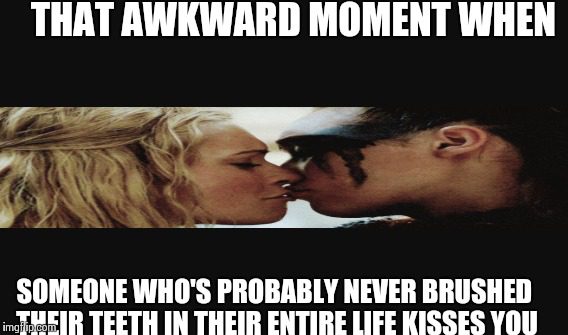
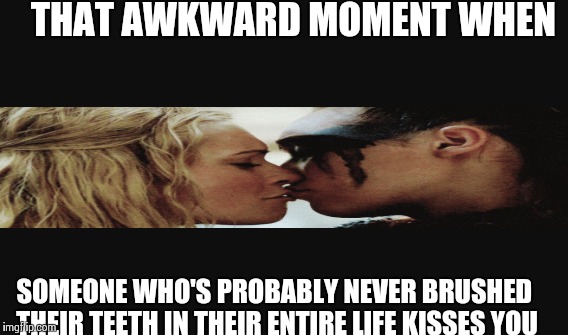
11. “That Awkward Moment When Someone Who’s Probably Never Brushed Their Teeth In Their Entire Life Kisses You”

Perhaps the worst part of someone having bad teeth, is when they try to kiss you.

“That Awkward Moment When Someone Who’s Probably Never Brushed Their Teeth In Their Entire Life Kisses You”

12. “I Get Uncomfortable When I’m Talking To People With Really Bad Teeth.”

If you are like most people and get uncomfortable talking to individuals with really bad teeth, then this guy might be perhaps the worst person to talk to. In fact, he may just have the worst teeth on this entire list!

“I Get Uncomfortable When I’m Talking To People With Really Bad Teeth.”

12 Extremely Funny Weightlifting Memes

Whether you are someone who spends a lot of time in the gym or not, you should certainly enjoy these memes. In addition to being very relatable for those who have engaged in weightlifting before, they are also very funny and should definitely make you laugh.

So, if you are ready to laugh at those who have failed miserably in the weight room, then sit back, relax, and keep on scrolling!

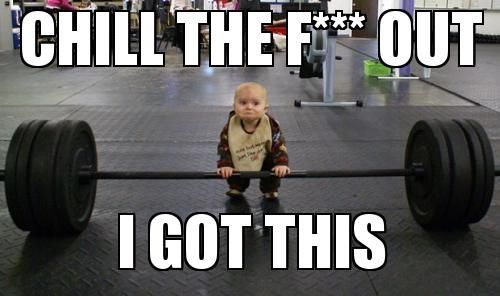
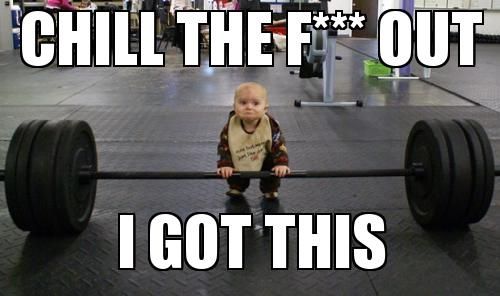
1. “Chill The F*** Out, I Got This”

Well, this little guy certainly gets an “A” for effort!

“Chill The F*** Out, I Got This”

2. “I Don’t Always Do Sit Ups, But When I Do, I Immediately Check In The Mirror To See If My Six Pack Has Arrived”

Not only is this one very funny, but it is also very true and should be relatable for most people who have done sit ups before!

“I Don’t Always Do Sit Ups, But When I Do, I Immediately Check In The Mirror To See If My Six Pack Has Arrived”

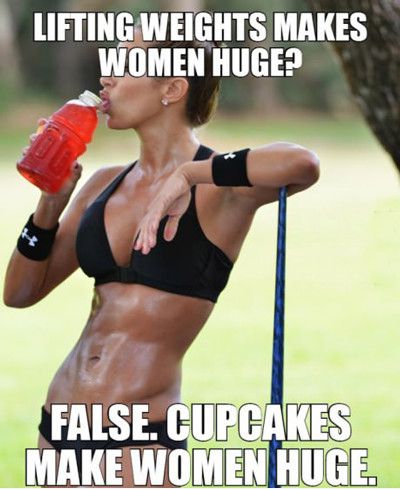
3. “Lifting Weights Makes Women Huge? False. Cupcakes Make Women Huge.”

A great weightlifting meme to laugh at (and also live by) for women who want to lose some extra, un-needed weight.

“Lifting Weights Makes Women Huge? False. Cupcakes Make Women Huge.”

4. “Suns Out. Guns Out. Stay Classy!”

This should be a funny one, especially for anyone who has seen Anchorman before…

“Suns Out. Guns Out. Stay Classy!”

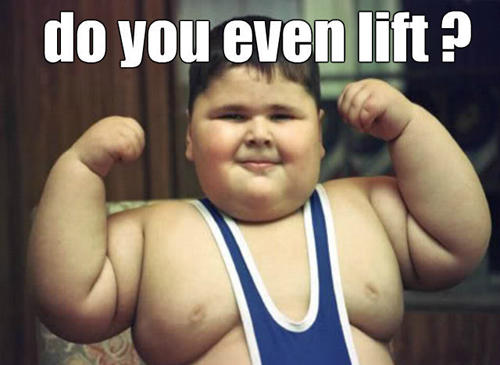
5. “Do You Even Lift?”

I am assuming that the young boy in this picture most certainly does not…

“Do You Even Lift?”

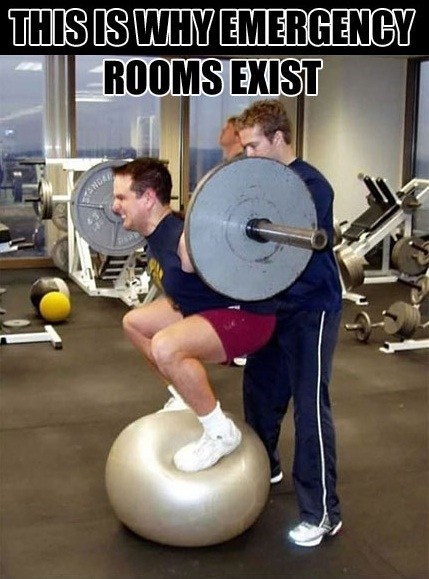
6. “This Is Why Emergency Rooms Exist”

Whether you lift weights yourself or not, you can probably tell that this is a terrible, terrible idea…

“This Is Why Emergency Rooms Exist”

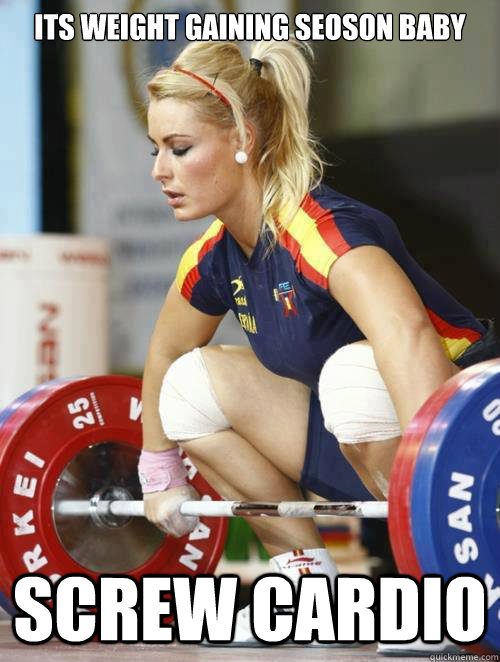
7. “It’s Weight Gaining Season Baby, Screw Cardio”

Definitely the more difficult season of the two, for both men and women… For bulking season its worth checking Mymixify.com to find solutions for more efficient results.

“It’s Weight Gaining Season Baby, Screw Cardio”

8. “When Someone Says, You’re A Girl, You Shouldn’t Be Lifting Heavy”

A great meme that should certainly be relatable for all the women who enjoy lifting weights!

“When Someone Says, You’re A Girl, You Shouldn’t Be Lifting Heavy”

9. “When The Weights You Used Last Week Are Way Too Light This Week.”

Well, to be honest, the image below is actually a very accurate representation of what this situation will make you feel like!

“When The Weights You Used Last Week Are Way Too Light This Week”

10. “Put Me In A Home, I Put You In The Ground”

Woah…well I certainly wouldn’t mess with her!

“Put Me In A Home, I Put You In The Ground”

11. “Your Oh Stop Face When Someone Notices The Gains”

Very funny, and perhaps the best part of weightlifting!

“Your Oh Stop Face When Someone Notices The Gains”

12. “No Squatting In The Texting Rack”

Well there are people who go to the gym to lift weights, and people who go to the gym to text…

“No Squatting In The Texting Rack”

14 Surprisingly Stylish Strawberry Tattoo Designs

Though they are typically geared more towards females, strawberry tattoo designs can be a treat to look at for everyone. In addition to being very creative and unique, they are also very colorful, allowing all who view them to really be impressed.

To prove just how great these designs can really be, we have created the list below. It is compiled of some truly amazing strawberry tattoo designs, that we are sure you will enjoy!

1. A Very Unique, And Very Vibrant Strawberry Ankle Tattoo

This one is not only very original, but it is also placed along the ankle, giving it a unique placement as well.

A Very Unique, And Very Vibrant Strawberry Ankle Tattoo

2. An Almost Three-Dimensional Strawberry Foot Tattoo

Much like the last design, this one is placed in a neat area (the foot) and is very well shaded, giving it an almost three-dimensional look! A great choice for those wanting to keep their tattoos hidden.

An Almost Three-Dimensional Strawberry Foot Tattoo

3. A Neat Chocolate Dipped Strawberry Forearm Tattoo Design

For those who love their fruit dipped in chocolate, this is certainly the tattoo for you!

A Neat Chocolate Dipped Strawberry Forearm Tattoo Design

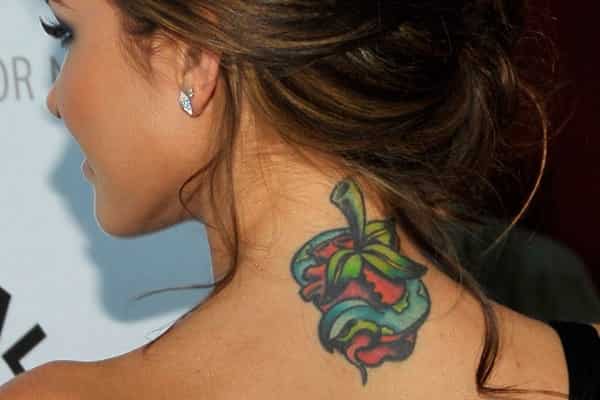
4. A Colorful Strawberry Neck Tattoo For Women

A great choice for any women wanting an upper back or lower neck tattoo. As you can see in the photo, the strawberry is even wrapped in a worm.

A Colorful Strawberry Neck Tattoo For Women

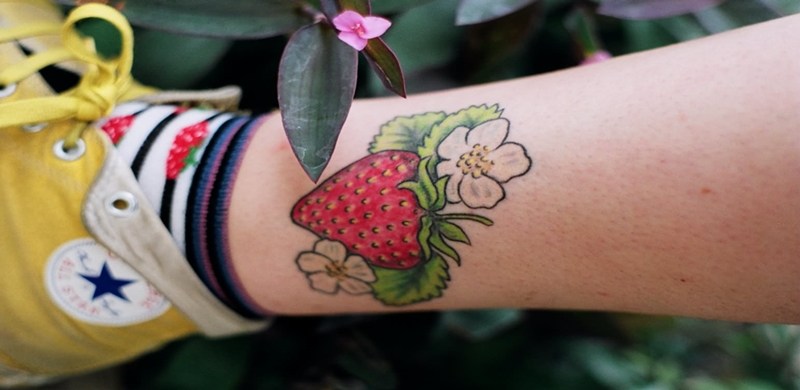
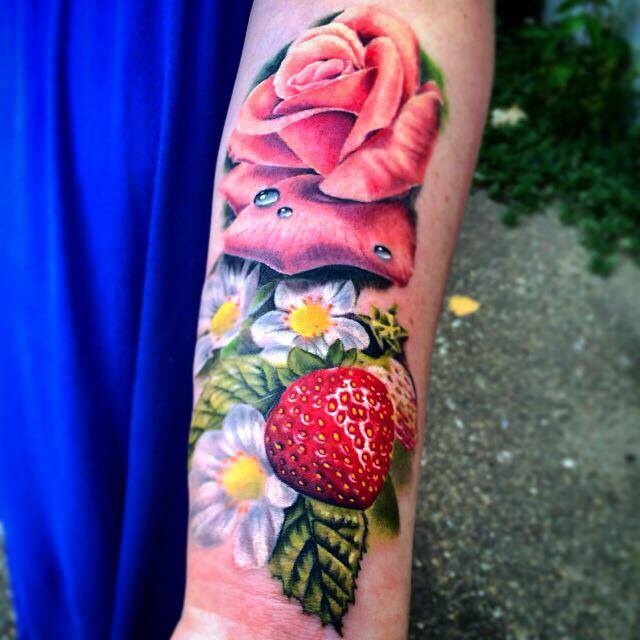
5. A Very Vibrant, And Also Very Detailed Strawberry Forearm Tattoo Design

Not only is this one done very well, but it is perhaps the most realistic looking strawberry on the entire list!

A Very Vibrant, And Also Very Detailed Strawberry Forearm Tattoo Design

6. An Overly Simplistic Strawberry Ankle Tattoo, With A Face

For those who enjoy funny, cartoony tattoos, this design is certainly a great choice. Since it is placed along the ankle, it can also be very easily hidden in necessary.

An Overly Simplistic Strawberry Ankle Tattoo, With A Face

7. A Realistic Strawberry Tattoo Design, That Covers Almost The Entire Foot

For anyone wanting to cover the vast majority of their foot with a fruit-based tattoo, this is perhaps the perfect choice…

A Realistic Strawberry Tattoo Design, That Covers Almost The Entire Foot

8. A String Of Strawberries, Placed Along The Upper Back

Done in a horizontal fashion, this tattoo fits perfectly along the upper back, chest, or waist.

A String Of Strawberries, Places Along The Upper Back

9. A Very Ripe Strawberry With A Knife Going Through It

Well, to be honest, I can’t tell if this person loves strawberries or hates them. Nonetheless, it is certainly a great tattoo.

A Very Ripe Strawberry With A Knife Going Through It

10. Matching Strawberries On Both Feet

Whether you’re a couple wanting to get a tattoo together, or just someone who really likes strawberry foot tattoos, these matching designs should certainly be of interest.

Matching Strawberries On Both Feet

11. A Mean-Looking Strawberry Upper Thigh Tattoo Design

Done in somewhat of a traditional tattooing style and placed along the upper thigh, this design certainly sticks out well. It also is very unique, due to the sword-crossed bananas at the bottom.

A Mean-Looking Strawberry Upper Thigh Tattoo Design

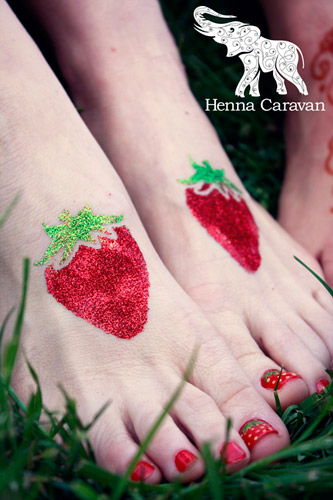
12. Two Sparkling Strawberries, One On Either Foot

Another great strawberry foot tattoo, this one done with some sparkling ink. Certainly a great choice for anyone wanting their tattoos to really stick out well!

Two Sparkling Strawberries, One On Either Foot

13. A Smiling, Cartoony Strawberry, With Flowers And A Rainbow In The Background

Not only is this perhaps the most creative strawberry tattoo design on the entire list, but it is also perhaps the most well done too. Even though it is cartoony, it is incredibly bold and very well outlined.

A Smiling, Cartoony Strawberry, With Flowers And A Rainbow In The Background

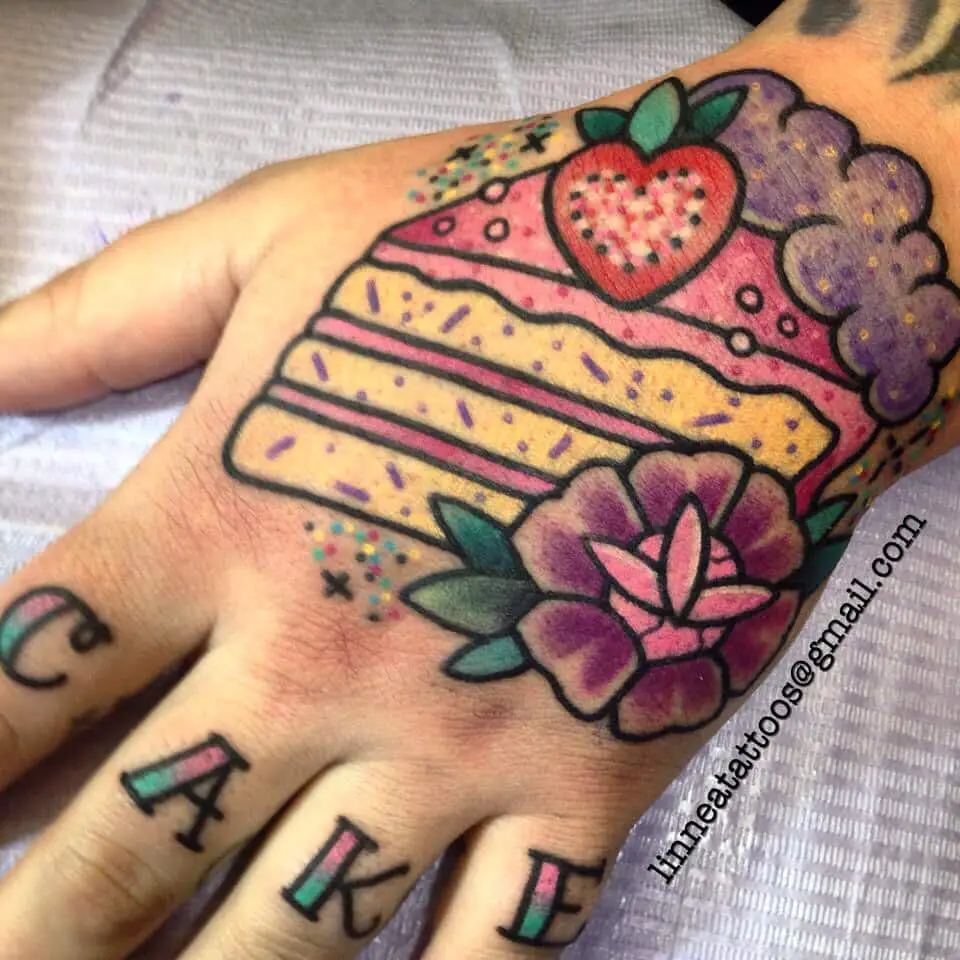
14. A Nice Strawberry Sitting On Top Of An Amazing Looking Cake!

This one was done so nicely, that it is actually making me pretty hungry. No joke!

A Nice Strawberry, Sitting On Top Of An Amazing Looking Cake!

11 Kangaroo Memes, Sure To Make You Laugh Every Time

Whether you have seen a Kangaroo in real life or not, the list below should certainly be of interest to you. Why? Simply because Kangaroo pictures actually make for some of the funniest memes around. Moreover, we compiled this list with the best ones we could find. So, without any further ado, here are 11 Kangaroo Memes, sure to make you laugh every time!

1. “Hey Girl, You Ever Been Down Under?”

Believe it or not, some Kangaroos actually pose like this in real life…

“Hey Girl, You Ever Been Down Under?”

2. “Sometimes I Think To Myself, Is All This Hopping Around Really Worth It?”

Though this meme is definitely funny, the Kangaroo in it seems kind of depressed…

“Sometimes I Think To Myself, Is All This Hopping Around Really Worth It?”

3. “Meanwhile In Australia”

Wow, this one actually happened…pretty weird and definitely funny!

“Meanwhile In Australia”

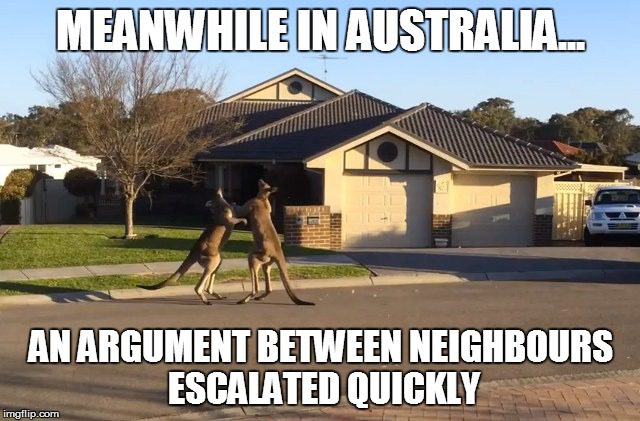
4. “Meanwhile In Australia…An Argument Between Neighbors Escalated Quickly”

Another unbelievably weird, yet also very funny moment for a picture…

“Meanwhile In Australia…An Argument Between Neighbors Escalated Quickly”

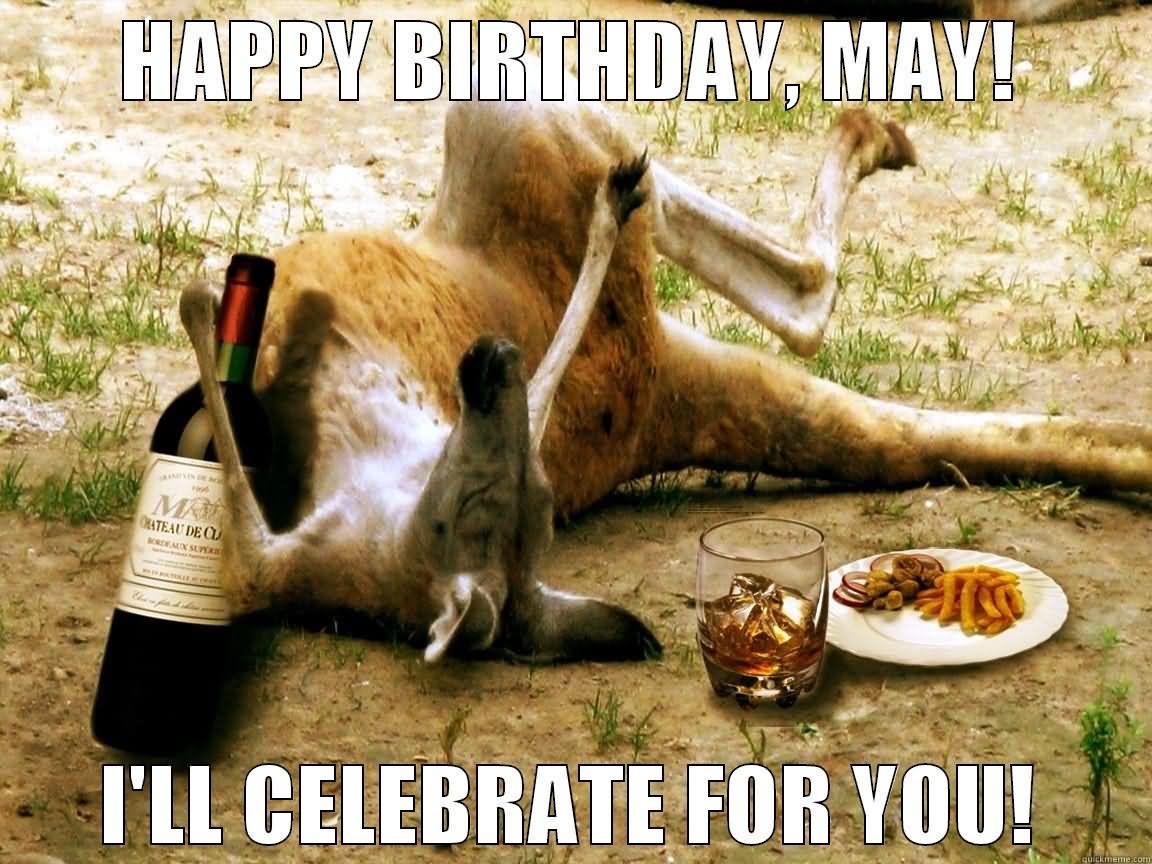
5. “Happy Birthday, May! I’ll Celebrate For You!”

A perfect example of what happens when Kangaroos party too hard…

“Happy Birthday, May! I’ll Celebrate For You!”

6. “They All Laugh At T-Rex, But Only I Know What It’s Like”

To be honest, I am having a pretty hard time deciding on whether this baby Kangaroo meme is more cute or funny?

“They All Laugh At T-Rex, But Only I Know What It’s Like”

7. “Up, Down, Triangle, Left, Circle, Square, Square, Down, Down, Right, Triangle + Square, Killer Combo!!”

It might not work in an actual video game, but it is nonetheless very funny to look at. What a perfectly timed picture!

“Up, Down, Triangle, Left, Circle, Square, Square, Down, Down, Right, Triangle + Square, Killer Combo!!”

8. “Kangaroos Are Just T-Rex Deers, Think About It.”

Woah, I laughed when I first saw it. But this is actually very true…

“Kangaroos Are Just T-Rex Deers, Think About It.”

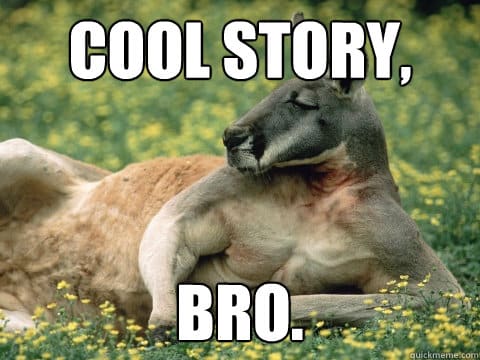
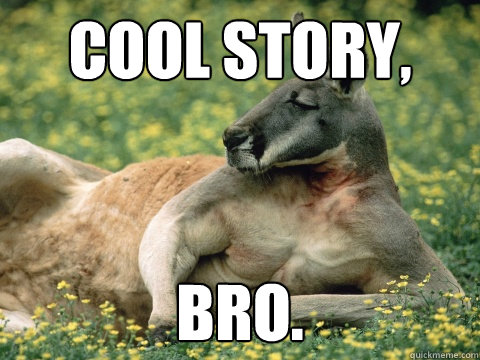
9. “Cool Story, Bro.”

Quite possibly the coolest Kangaroo to ever exist…

“Cool Story, Bro.”

10. “They Said I Can Be Anything, So I Became A Model!!!”

A very motivated, and also very funny Kangaroo, posing for a picture.

“They Said I Can Be Anything, So I Became A Model!!!”

11. “Australia Finds A Unique Solution To Its Lack Of Available Foster Homes. Go Home Kid, You’re Drunk.”

There are a lot of things going on in this picture, and certainly a lot of Kangaroos to laugh at…

“Australia Finds A Unique Solution To Its Lack Of Available Foster Homes. Go Home Kid, You’re Drunk.”