Whether you‘re just wanting to see how you‘ll likely look in a few decades, or you‘re in need of an older look for a project, the tutorial below will certainly help.
In this post, we will thoroughly explain to our readers exactly how to make yourself look older in Photoshop.
And fortunately, no matter what level of experience you have with the program, these directions are clearly laid out and very easy to follow. So, if you‘re tired of your babyface and want to add some years to your look, be sure to keep on scrolling!
NOTE: Fortunately, you can use the aging effect with just about any portrait or photo. Therefore, whether you are wanting to see how you‘ll look in the future, or how your friends will look in the future, this post will be extremely beneficial.
1. Find A Relatively Similar Looking Old Man/Woman

Though you may not look too elderly in your photos right now, you should be able to predict and compare some of your current features to that of someone much older. By simply finding a photo of an older man or woman (depending on your gender), with a similar facial structure, you can get an idea of what you‘ll need to edit in order to make this happen.
Some of the most critical factors and key features to look for when aiming to compare yourself to the older model you select, are facial bone structure, height/weight, and the overall style of their appearance.
More Photoshop Tricks
2. Fix Any “Temporary“ Features On Your Current Image

What we mean by this is that – if there are any cuts, scratches, acne marks, or bruises on your current images, make sure to remove them before moving forward. Why? Simply because you‘re not likely to have them decades from now, so leaving these marks might be a bad idea.
NOTE: It is also suggested that you make these edits on a separate background layer. So, to create an additional layer, simply select Layer > New > Layer Via Copy (Control-J). After doing this, you can then use the Spot Healing Brush Tool (J) to edit and heal your current image.
Step 2
3. Create A Realistic “Receding Hairline“
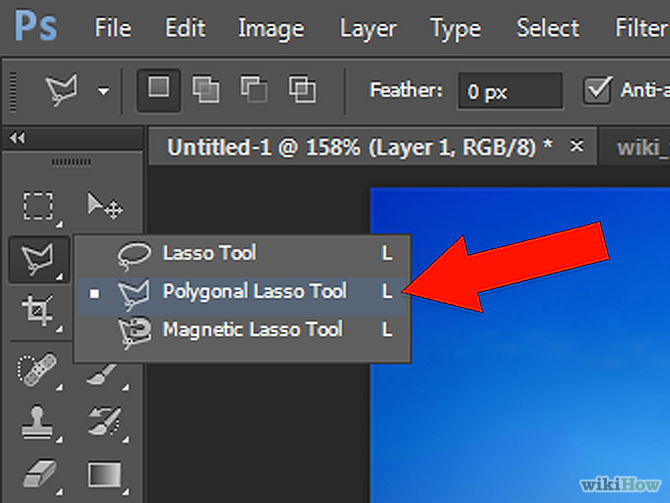
Unless your grandparents are lucky enough to have full heads of hair, then you‘re likely going to need this step. Fortunately, editing your hairline is fairly simple, considering all you need to do is remove the hair from your forehead, and push it back towards the back of your head.
To do this, select the Lasso Tool (L), then set the Patch Tool (J) to Content-Aware, and drag the selected area straight down toward the forehead. This will allow you to use a sample from your current skin and replace the hair with it.
NOTE: When first using these tools, the image may appear somewhat unrealistic, however, you can edit your patchwork and move the hair accordingly, until you are happy with it.
4. Create Some Old-Man/Old-Woman Wrinkles On Your Skin
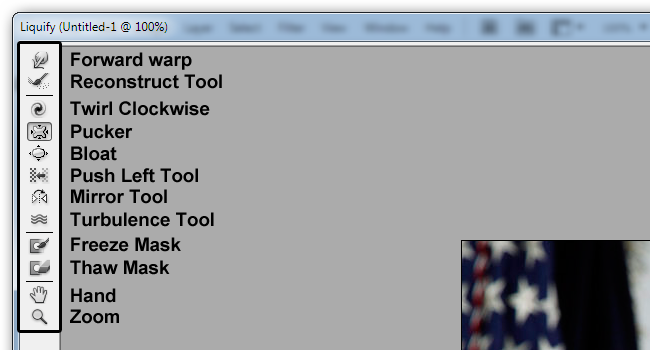
It is common knowledge that as you get older, your skin starts to wrinkle. So, this step should come as no surprise. Fortunately, much like with creating a receding hairline, implementing wrinkles on your skin via Photoshop, is fairly simple. All you will need to do is edit the structure of your face to create some lines throughout the skin. Some of the most common structural changes that come with old age include sunken in eyes, a more pronounced nose, and an almost shrunken neck. Therefore, you will need to use the Liquify filter and implement these structural changes(more in Photoshop Manipulation Tutorial).
Using the Liquify filter is not very difficult, even for novice Photoshop users. If you have experience with this filter already, simply go ahead and start editing, however, if you are new to this tool, you‘ll want to use it as a Smart Filer. This is done by going to Layer > Smart Objects > and then covering it to a Smart Object.
NOTE: You can also launch the liquify feature via Advanced Mode.
When using the Liquify filter for the first time, it is likely that you‘ll have some editing to do afterwards. However, this is normal and shouldn‘t be something that you worry over. In fact, after just a few touchups, your image should look like it has been professionally edited!
NOTE: For those who are wanting to really get their image looking perfect, the Smart Filter is definitely recommended. You can also use the Bloat Tool (B) to adjust the nose. This tool is great for making brush size slightly smaller than the default setting and intricately editing small features, such as the tip of your nose.
You can bloat other features of your face as well, including the ears, lips, and right below the eyes – in order to give them that old, sunken in feeling. Just be careful not to use the Bloat tool too much, as it may start to give your face a rather unrealistic look if you overuse it.
After completing the previous steps, you will want to use the Pucker Tool (S) in order to maximize your brush size, and edit your lips/mouth. This tool is great for giving your lips a very realistic old man/old woman look and will certainly help sink in your face.
NOTE: The Forward Warp Tool (W) is another very beneficial tool for this step, and should help tighten the skin on your face and possibly even further wrinkle your lips. If for any reason, the editing is too prominent and you want to pull back a little bit, you can use the Smooth tool and add a layer of softness to your entire face. The Forward Warp Tool (W) is also good for sharpening/squaring the your face, and thickening the edge of your neck.
5. Edit Your Cheeks, And Make Them Droop Towards The Bottom Of Your Face (For Women)

Another very common feature amongst older men (and mostly women), are their drooping cheeks. When approaching older age, your cheeks are bound to droop, so if you want your image to look realistic, then this step is strongly suggested.
To droop your cheeks and really make yourself look older, simply select a large portion of each cheek and pull it down just a tad. Fortunately, only a little bit of downward pulling is needed in order to complete this step.
6. Thin Out Your Hair, And Make Yourself Nearly Bald
Though it may sound similar, this step is completely different from the “hairline editing“ we did earlier. The sole purpose of Step 6 is to thin out any hair that you have left on your head. To do this, you will need to use the Push Left Tool (O) and push the pixels to the left while moving the tool in an upward direction, and push them to the right while moving the tool in a downward direction. This may sound a little complex, but rest assured, it is actually very easy, and will certainly give you the look you are after.
NOTE: You will need to move the tool down and to the right for the inside of the hairline, and for the outside of the hairline, you will do the opposite.
At this point, assuming you‘ve done all of the preceding steps correctly, your face should already be looking significantly older.
7. Add Some Much Needed Final Touches To Both The Hair And The Skin With The Color Range Tool
After thinning out your hair to the extent you would like to, you are going to need to focus on the skin, because, as you probably already know, peoples‘ skin tends to change as they age. In the same way that your darker hair should now be turned lighter, you should do the same with your skin. Fortunately, you can lighten your skin tone very quickly and easily by simply altering the tonal value. To do this, simply select Color Range, and then choose the Skin Tones option. Photoshop also allows you to adjust the Fuzziness of your image, and it is highly recommended that you set this as high as possible. At this point, the skin shouldn‘t look perfect, but it should definitely appear more appropriate for an old man/old woman.
NOTE: In addition to that which is explained above, you are going to need to add a Hue/Saturation layer as well. This can be found within the Colorize option panel and you can change the adjustment layer‘s blending in order to reduce the Opacity levels. It is suggested that you set the Hue to 23, the Saturation to 30, and the Opacity to 70%.
To add the finishing touches to your mask, you can use the Soft Round Brush. When using this tool, it is suggested that you paint with black over the neck, hair, and eyes in order to remove the hue/saturation effect. Then, you can use the white paint in order to shadow certain areas, such as the chin.
NOTE: If any part of your image is too Saturated or “red“, it is suggested that you use the Quick Selection Tool (W) to adjust the coloring. You could also choose the “Reds“ option and set the Hue to +6, set the Saturation to -17, and set the Lightness to 0.
NOTE: After completing the steps above, be sure to refine all your edges via the Refine Edge button, then set the Radius to 10 px and the Shift Edge to -30%.
6. Some Finishing Effects To Compare Your Young Self To Your Old Self

Right now, you should have a pretty good idea of what you‘re going to look like as an old man/woman. And fortunately, this last step is going to make it even clearer.
You are now going to add an additional layer to the portrait, by going to Edit > Fill. For the best results with this step, it is strongly recommended that you adjust the Contents to roughly 50% Gray. After making these adjustments, you‘re going to want to edit the blending mode. The best setting to put this on is Overlay, and you should set the Opacity to 50% while you‘re at it.
NOTE: You can also use the Burn Tool to outline each of the wrinkles on your face, while using the Dodge Tool to highlight each of the creases.
Conclusion
After following the steps above, you should be left with an image of you as a much older person. Though there are more steps associated with this technique than there are in most other tutorial posts, the process is certainly worthwhile and definitely recommended to new Photoshop users. Not only will it give you a feel for just how great this program really is, but it will teach you how to learn a lot of the tools that you would otherwise go without trying.