
This simple technique will reduce banding and streaking so your gradients look nice and smooth. Before you think about altering your colors, make you try this first.
There are few things in life that get me wound up more than banding problems. It doesn’t matter if you are working at 72 or 300 resolution, it will eventually come to haunt you and will be largely based on the color combination you are using in your gradient. Before considering altering your colors or the contrast between them, let’s try and correct it. I discovered this technique about 2 years ago after trying countless methods that never really gave me the results I was looking for.
How To Correct Banding In Your Gradients Using Photoshop
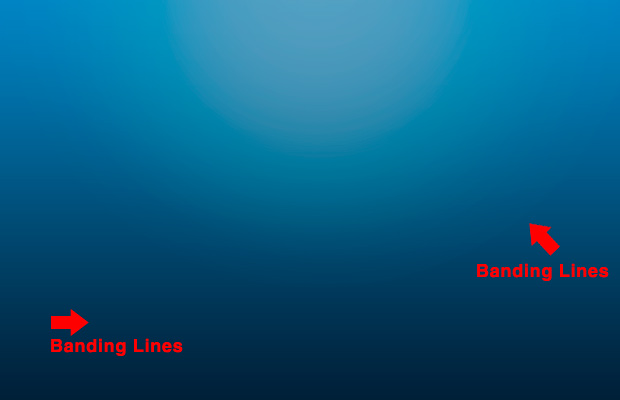
The image below shows banding in action.
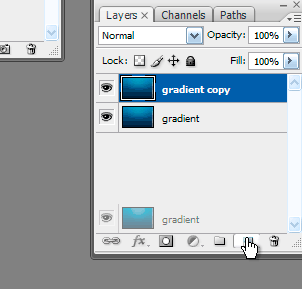
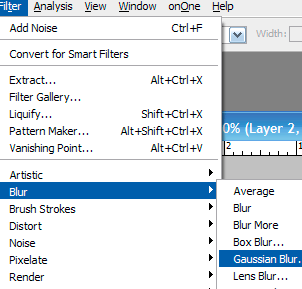
Once you have your gradient made and notice some banding, the first step is to duplicate the gradient layer by dragging it onto the new layer icon. Now make sure you are working on your gradient copy layer and go to the filter menu and select gaussian blur.
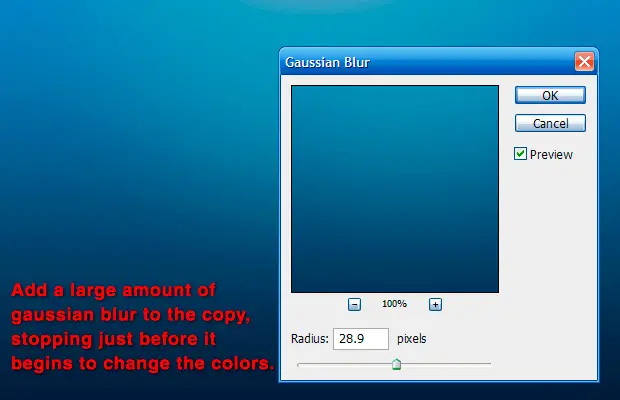
You want to add a large amount blur but make sure you don’t alter the colors by adding too much. When adding a large amount of blur you will create some transparency on your edges. To make sure this doesn’t affect your gradient, make sure you leave your original gradient turned on and directly below the copy.
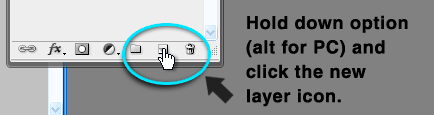
Now, click the new layer icon at the bottom of your layers pallet while holding down option (alt for PC)
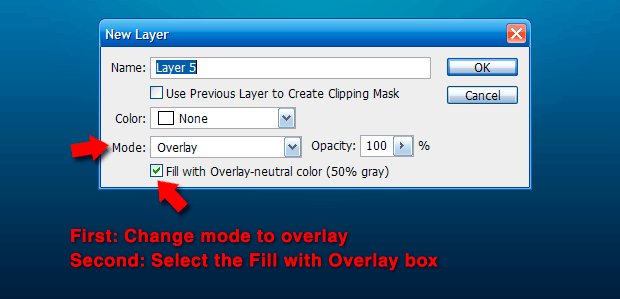
After clicking the new layer button, a new layer dialog box should appear if you were holding down the option or alt key. First change the mode to Overlay and then select the Fill with overlay – neutral color (50% – gray) box. Change the layer name to something simple like gray overlay and hit the ok button.
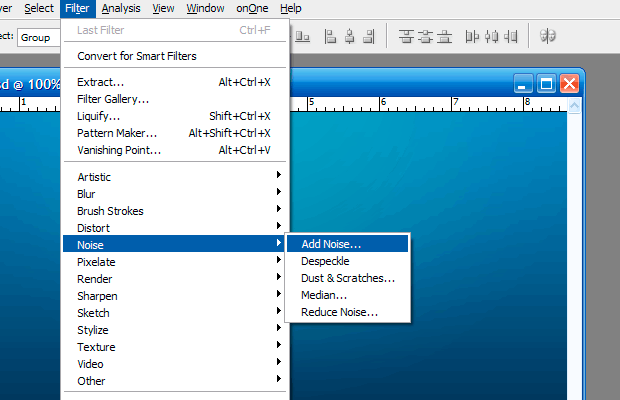
You should not notice any changes in the document besides a new layer in the layers palette. Now go to the filter menu and select add noise.
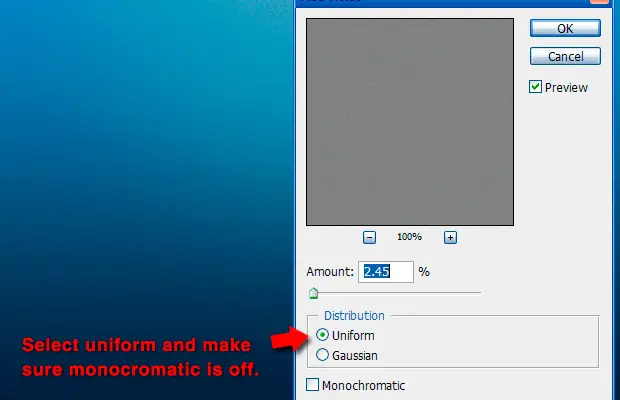
When adding noise, the amount you select will be different for every gradient. You want to make sure you use very little because too much will give it a noticeable texture. It’s a very fine line and in some cases you will have to decide if a little more texture is better than not completely eliminating the streaks. Just remember you can always lower the opacity of the noise layer if you later decide it’s too much.
For the last step I like to go around the edges with a soft brush in the darker areas and mask out some of the noise so I can blend it in with a solid color easier. If you don’t do this, you will have some very obvious hard edges. You might also add a new layer and select the gradient tool going from solid to transparent adding a slight gradient to the edges in the color of your choice. If this were going to the web then that’s how I would do it.

Now that we have our gradient corrected we can move on to bigger and better things like finishing our design! Thanks for following along.


This article has been shared on favSHARE.net. Go and vote it!
this is cool, thanks – I had no idea it was possible
Great post, I have often wondered how to do this!
Thanks for sharing this! I always ask to myself why Adobe doesn't fix it…
Thanks for your replies buddies. Appreciated!
Thanks for your replies buddies. Appreciated!
Very impressive tips :-) thanks for sharing it.
Man. Those bands have been driving me crazy forever. Thanks for the tip.
Seriously i never try this technique.LOL. i find it useful.thanks for sharing :)
Brilliant! I saved this page to save me countless headaches in the future. Thanks!
this is for jpg too?
Flattening gradient layers while working in 16 bit per channel mode (8 bit per channel is normal) and then reducing color space back to 8 bit per channel should also make it dither. I personally always make my gradients using the gradient tool, since it has a dithering option that also nicely, non-hackishly reduces banding.
Unlike the author of this tutorial, Dada is absolutely correct.
Follow the tutorial as instructed and you will notice that the heavy gaussian blur adds yet more banding. And as for the noise layer… Well, you wanted a smooth gradient right?
Even if you have to create a seperate working file and then copy the gradient accross, dither from 16 to 8 bit and you won’t be dissapointed.
oh my god. thank you, random commenter. you saved my life.
Thank you, so much, for this comment.
Maybe it’s different in different versions of Photoshop, but the gradient tool in PS7 (which I’m using) doesn’t seem to help to reduce banding significantly, especially for darker colors, even if the dithering option for the tool is on. It does seem to generally work better than a gradient overlay layer effect, but it’s still not good enough. I might try out the techniques mentioned in this article, in your comment and elsewhere, to see if I can reduce the banding some more.
Wow thx for the tip, this works like a charm!
thanks, it works!!!!
I love you. Actually.
no homo
Thanks very much, incredible technique. Saved me.
Very nice, thanks :)
That's a great tip! Thanks a lot!
Martin
excellent !!! I will try this technic
Banding are a small but huge problem at the same time
thanks for share your skills around this !
THANK YOU!! I have been trying to figure this out forever and most of the solutions I have found online just didn't do the trick for me. This one worked like a charm.
You just saved my butt!!! Thanks!
nice try!
Good stuff. Useful!!!
I use smart filters. They allow tweaking and fine tuning of the filter effects after they have been applied. Awesome stuff!
I create a duplicate layer of my gradient layer and create smart object.
Then I add noise basically the same way as above as a smart filter. Opacity around 15-20%.
And ON TOP of that, I add a gaussian blur filter with a low pixel radius, between 1.2 and 1.8 pixels. Opacity around 30-40%. This effectively works as the opposite of the noise and can help to make the noise a bit larger which is SPECIFIC TO how large your image is. You will need bigger noise if your gradient has very visible shifts, especially at very high resolutions.
Then the final step is to use the smart filter mask to remove the effect where it becomes visible in medium-dark areas or whatever.
If you have a grey mask in CMYK, you may find it useful to use luminosity mode for the whole layer.
very good tip, thanks for sharing.
Thanks for sharing this very useful tip.
Its a pleasure.
Like your writing skill! Even though you should try to make a few things to improve it.
Like your writing skill! Even though you should try to make a few things to improve it.Thanks.
Sure, can you please tell us what you didn’t liked.
very good tip, thanks for sharing.
This applies to backgrounds, but what about shapes or using gradient overlays in blending options? Blur messes up the edges of shapes like this – so can’t really accomplish the same thing.
Gradients are painful on the iPhone…
This is a great tutorial and a very useful technique. I’ll definitely come back to this one next time I’m using gradients.
Thanks.
The problem causes gredient banding when you look on the screen is color quality on screen display of your computer.
Go to “Display properties” (right click on desktop>select properties).
On “screen resolutions” move the slider all the way to the right.
On “color quality” select ” highest (32 bit).
After doing that,The gredients is looking very smoothly in photoshop cs5,no more banding.
My ViewSonic LCD 22′ ,screen resolutions 1650×1050 ( 4 years ago).Color quality was set
“medium (16 bit),I ‘ve got problem with gredient banding in photoshop.After doing all the research related with that problem,but i am not quite happy with that .I try to change “highest (32 bit) on color quality.It works for me ,there is no more gredient banding in photoshop’
I am very happy with that result.
Thank you very much !! Great technique to diminish banding. It works great !
Another think that I think is useful is to create the image with which you will work bigger than the final size that you will use, let ´s say twice as wide and twice as tall. When you finally finish creating you image with the gradient in it and afterwards you rescale it to a smaller size (the size that you originally wanted), I think the resizing process helps conceal the banding and the noise added with the technique explained here even more. Just give it a try if you want.
Thanks again.
Thank you. Adding noise on an overlay channel is a great trick.
Interesting tut. :) Thanks for putting it up.
Oddly, incorporating the gaussian blur layer made the banding considerably worse in my case (no matter the blur value).
I found you can skip the gaussian blur layer totally. Just take the original banded gradient layer and do the “Alt+NewLayer icon [with overlay mode, and fill with overlay-neutral 50% grey]” stage and add the noise and that works a treat.
I guess every application will differ depending on the colour blend you’re trying to use.
Cheers.
Cool trick…. Nothing much to compliment
awesome tutorial !! thanks a ton
just a point to add here, if you are doing black and white gradient, in your last step change the blending mode to COLOR instead of OVERLAY, the output is great.
Thanks again
Iqbal
just nice tricks and amazingly done the slodive design here they done..you can see is amazing and creatively …you can be proud of that…
awesome is awesome! thanks! :)
Simple trick that really sticks in the mind… +1’d this
It’s really nice. I always encounter this problem and this gave the solution. Honestly, I really like this article. Thanks for the tip.
Nice article. In situations where the gradient is transparent, sometimes I find I can address this by duplicating the banding layer (similar to one of your steps above) but instead of blurring, move the duplicated layer up/down or left/right to intersect the bands of the original layer. This takes a bit of re-adjusting of the transparency on each of the 2 layers, and may require masking on edges of the new layer (to fix where the gradient starts/stops), but can be effective. Cheers!
@Dada: You’re advise on using the gradient tool (rather than layer effects) is a much simpler and quicker alternative. Much thanks.
So nice to see an wonderful trick. I generally used this Gaussian blur effect but after seeing this tutorial I exactly came to know the purpose of using it efficiently.
Will definitely give this a try as I have several gradients that need ‘fixing’ as they have obvious banding problems. Well done!
This is very informative and helpful. I will try to it soon. ^^
Wow i got to learn something new in photoshop which will help me a lot. Thanks for this share.!!
Thanks a lot for sharing,its great tips,i will try this tricks in my PhotoShop soon.
Very nice idea and tips. Thanks for the share. Will surely try this one. ^^
Gausian Blur is a nice trick to apply to correct the banding in your gradient using photoshop.
Awesome ides and tips are shared here i like these post very much i will surely try these tips.
Very heplful tutorial
Hello, I am an artist who photographs jewelry and small objects on gradient paper. I have several files of gradients stored but what I can’t find is the proper paper to print them on that reproduces a heavy dramatic black graduating into the soft white. Under the scrutiny of close ups and good lenses I am getting so much paper texture that I can’t easily photoshop out and shiny, smooth photo paper is too glaring and causes a spattering effect. Any suggestions on some paper to try that will give me a relatively non-shiny surface without all the grain?